Customers
Import Customers and Jobs From Your Old Software: Bring Your History Over in Minutes
Switch to Servgrow without retyping anything: import your old system's export and get every customer, address, job and invoice, with past payments marked paid, after checking exactly what will be created.
Updated November 3, 2026 · 8 min read
Switching software should not mean starting with an empty account. Export your jobs from your old system, and Servgrow brings over the customers, their addresses, every job and its invoice in one go, with what was already paid marked as paid. You see exactly what will happen before anything is created, and nothing is emailed or texted to your customers.
Open the importer
Click Jobs in the left menu.
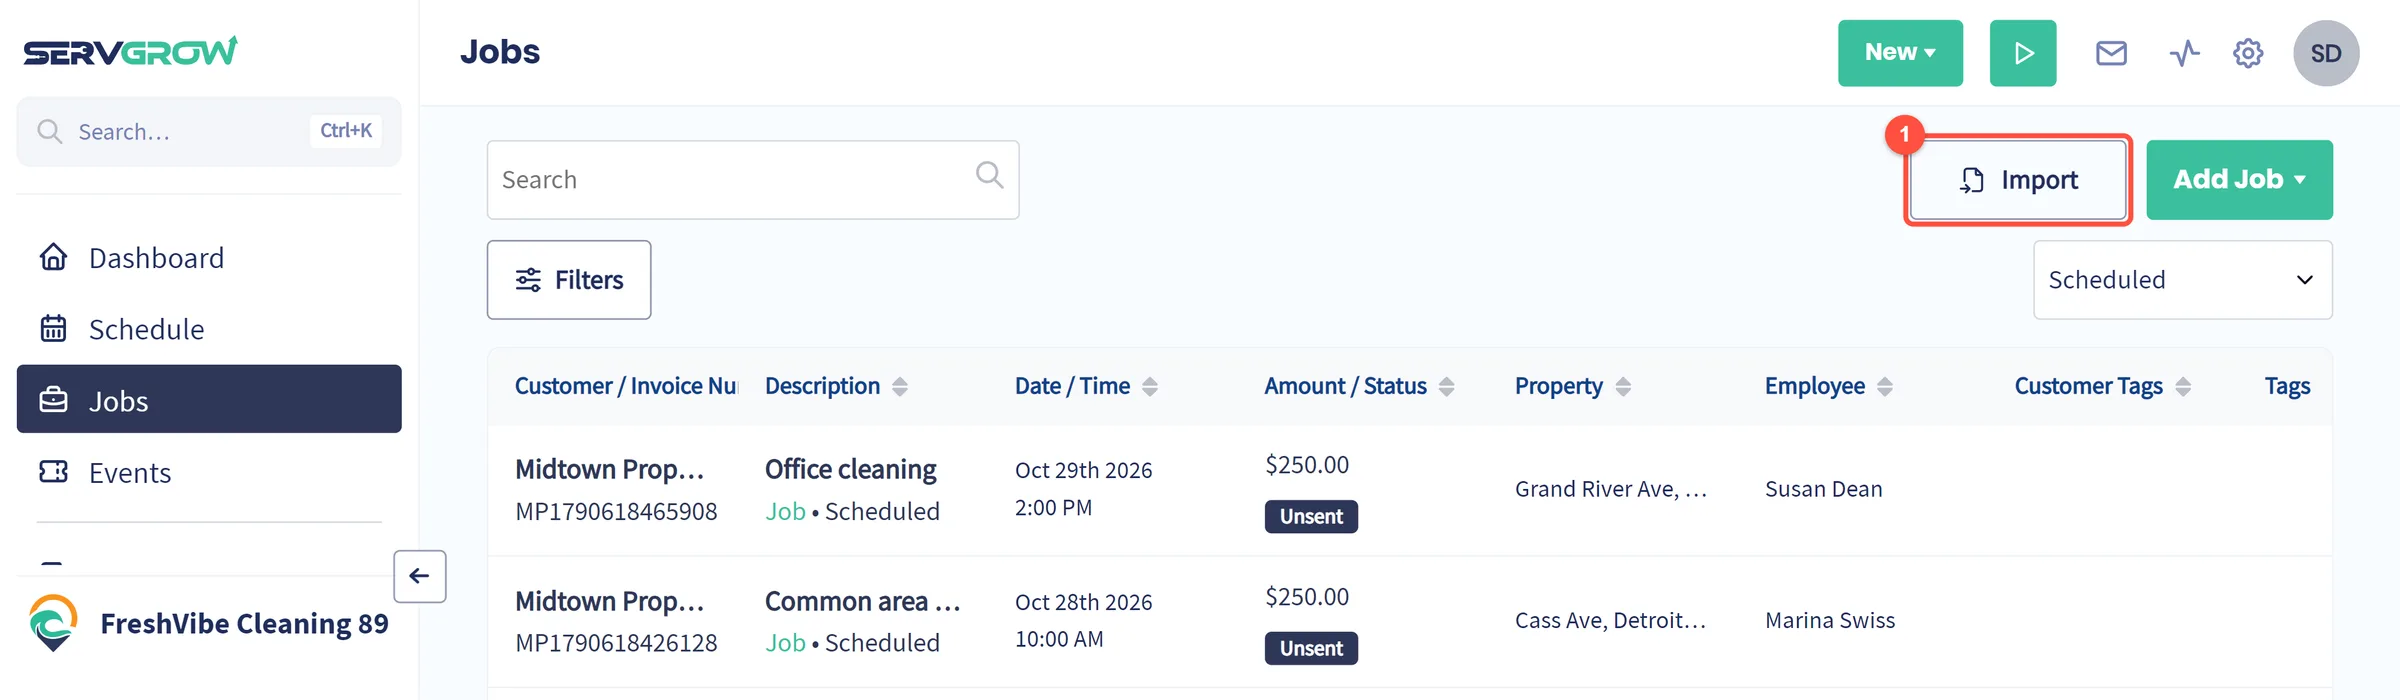
- Click Import.
The import has four steps: File, Mapping, Review and Done.
Step 1: Choose your file
Export your jobs or invoices from your old software as a CSV or Excel file. The columns can be named anything; you match them to Servgrow in the next step.
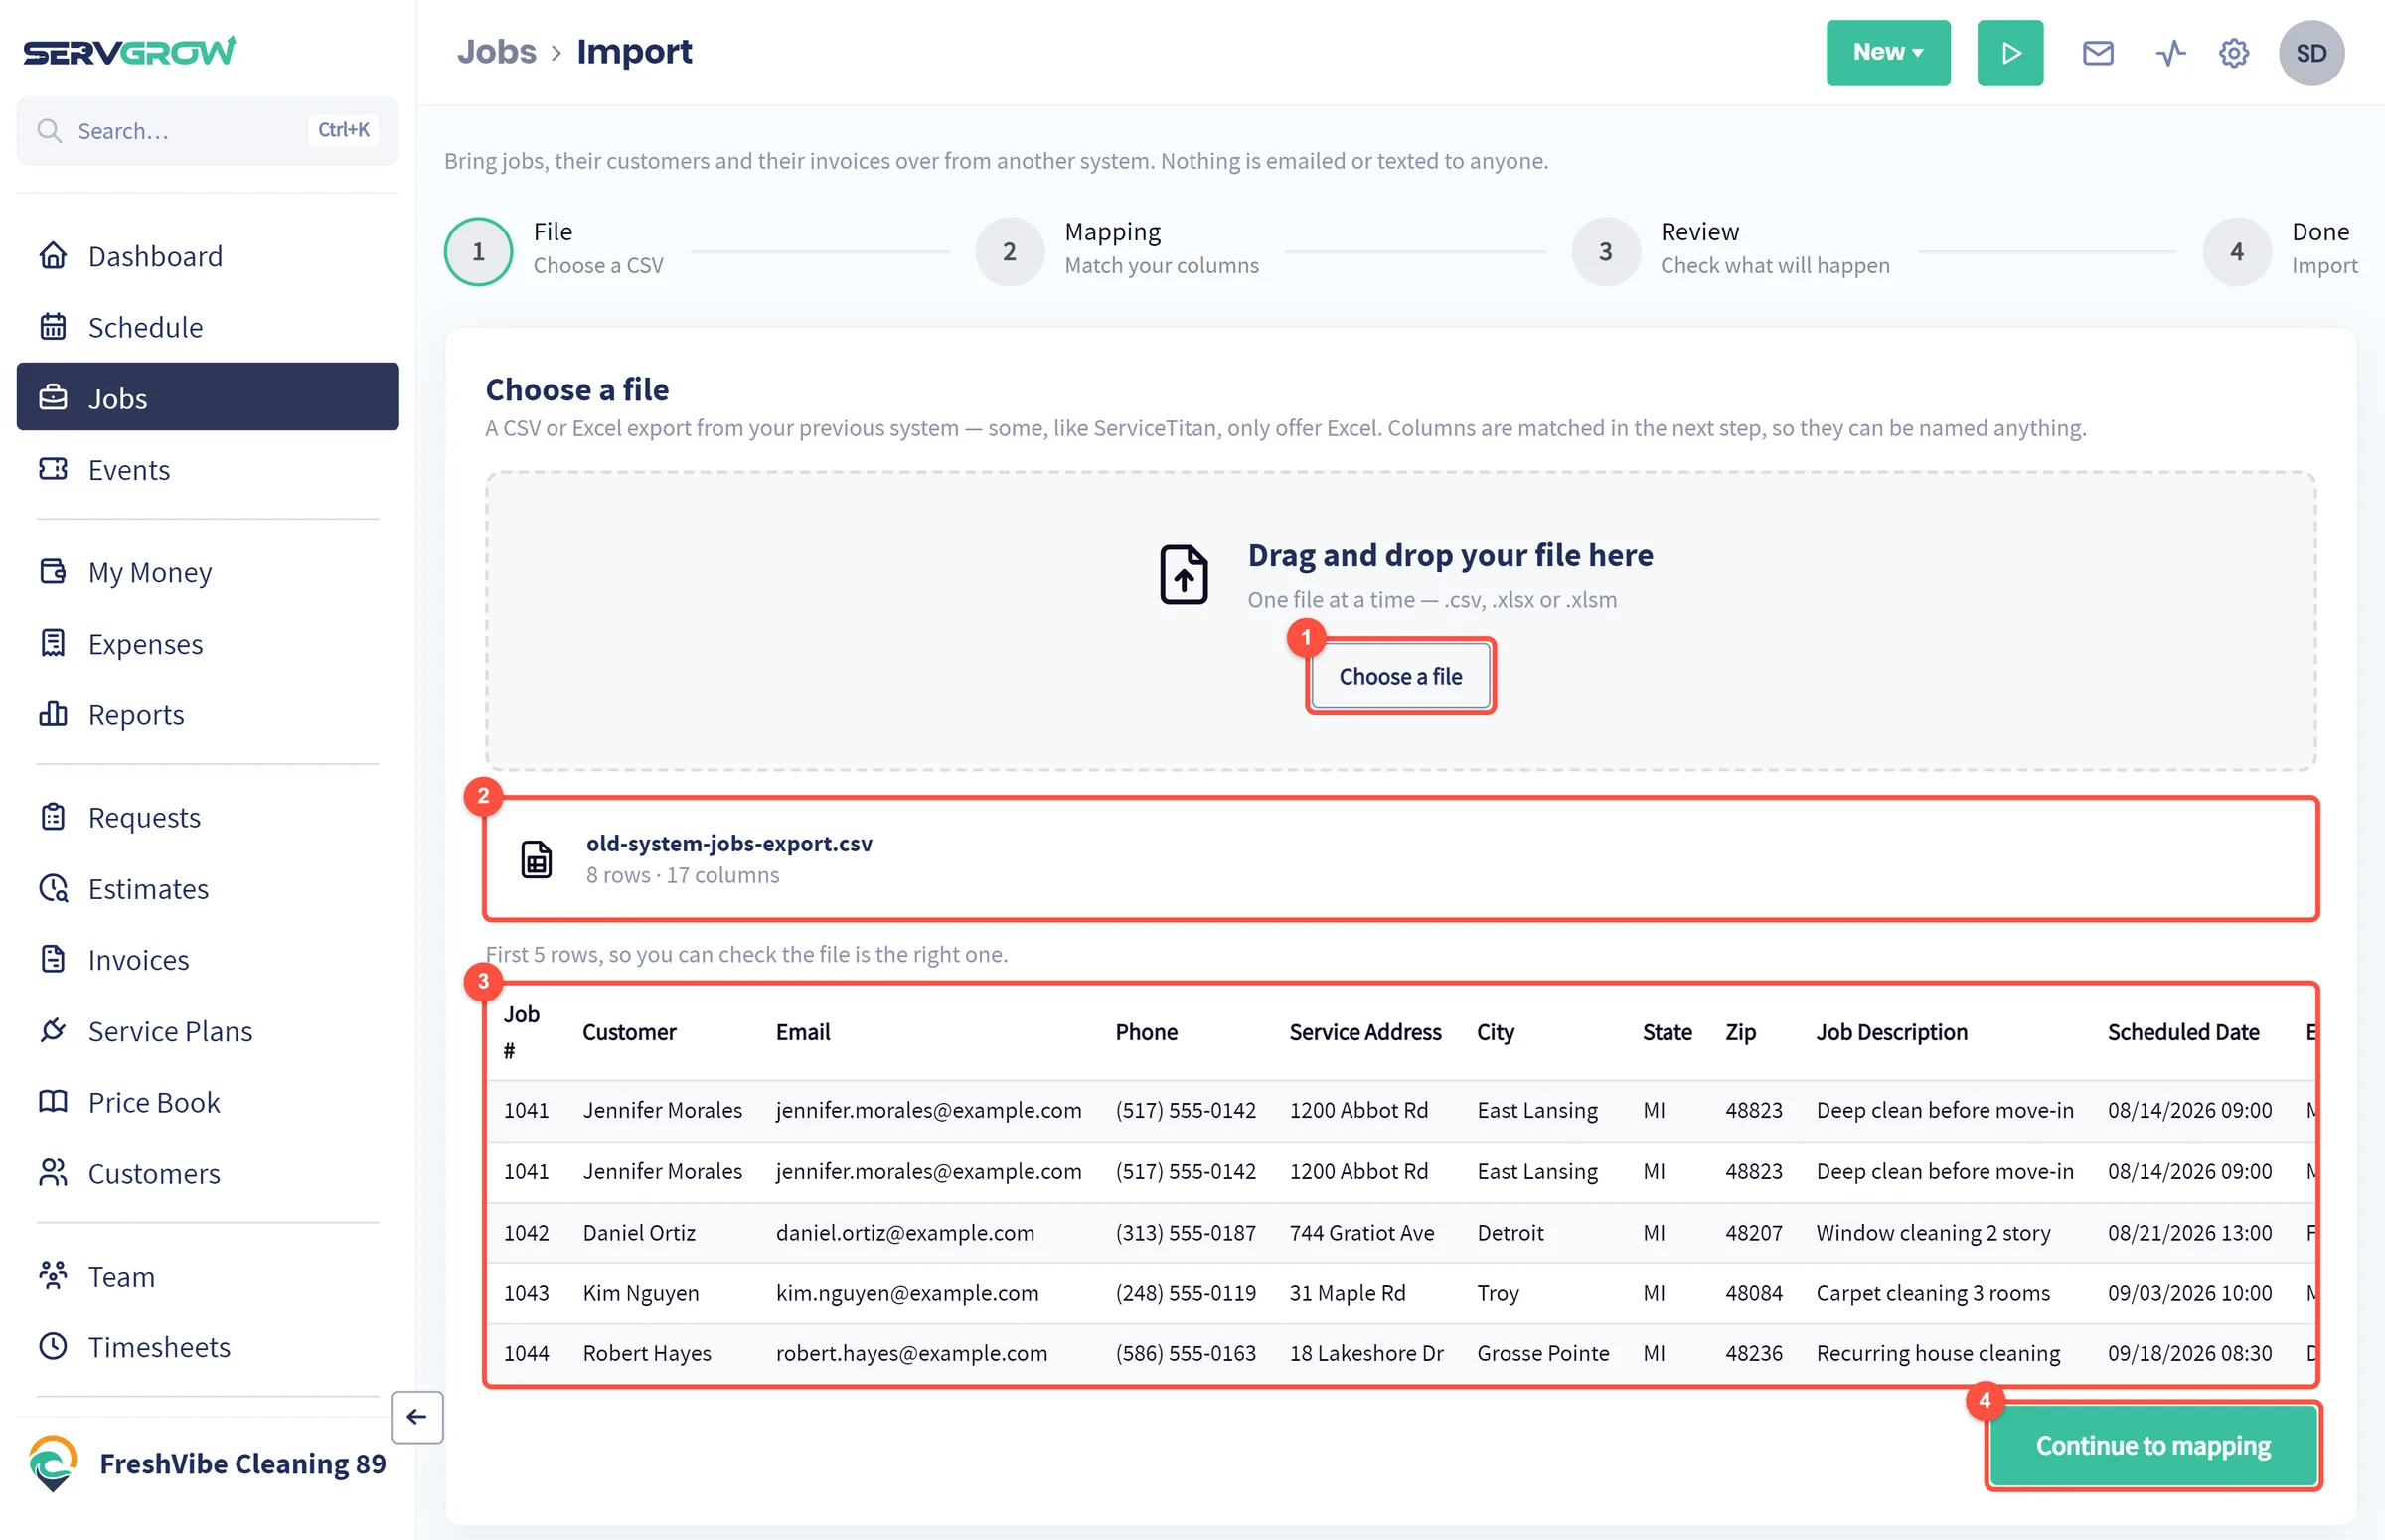
- Click Choose a file, or drag the file onto the box. One file at a time: .csv, .xlsx or .xlsm.
- The file name appears with how many rows and columns it has.
- The first five rows are shown, so you can check it is the right export.
- Click Continue to mapping.
If Servgrow cannot read the file, open it and save it again as .xlsx (older Excel files and password protected files cannot be read). If your jobs are on a second sheet, save that sheet as its own file.
Step 2: Match your columns
Point each Servgrow field at the column in your file that holds it. Nothing is guessed for you, and under every field you see the value it takes from your first row, so you can check each match against real data. Fields marked Required must be matched before you can continue.
Customer
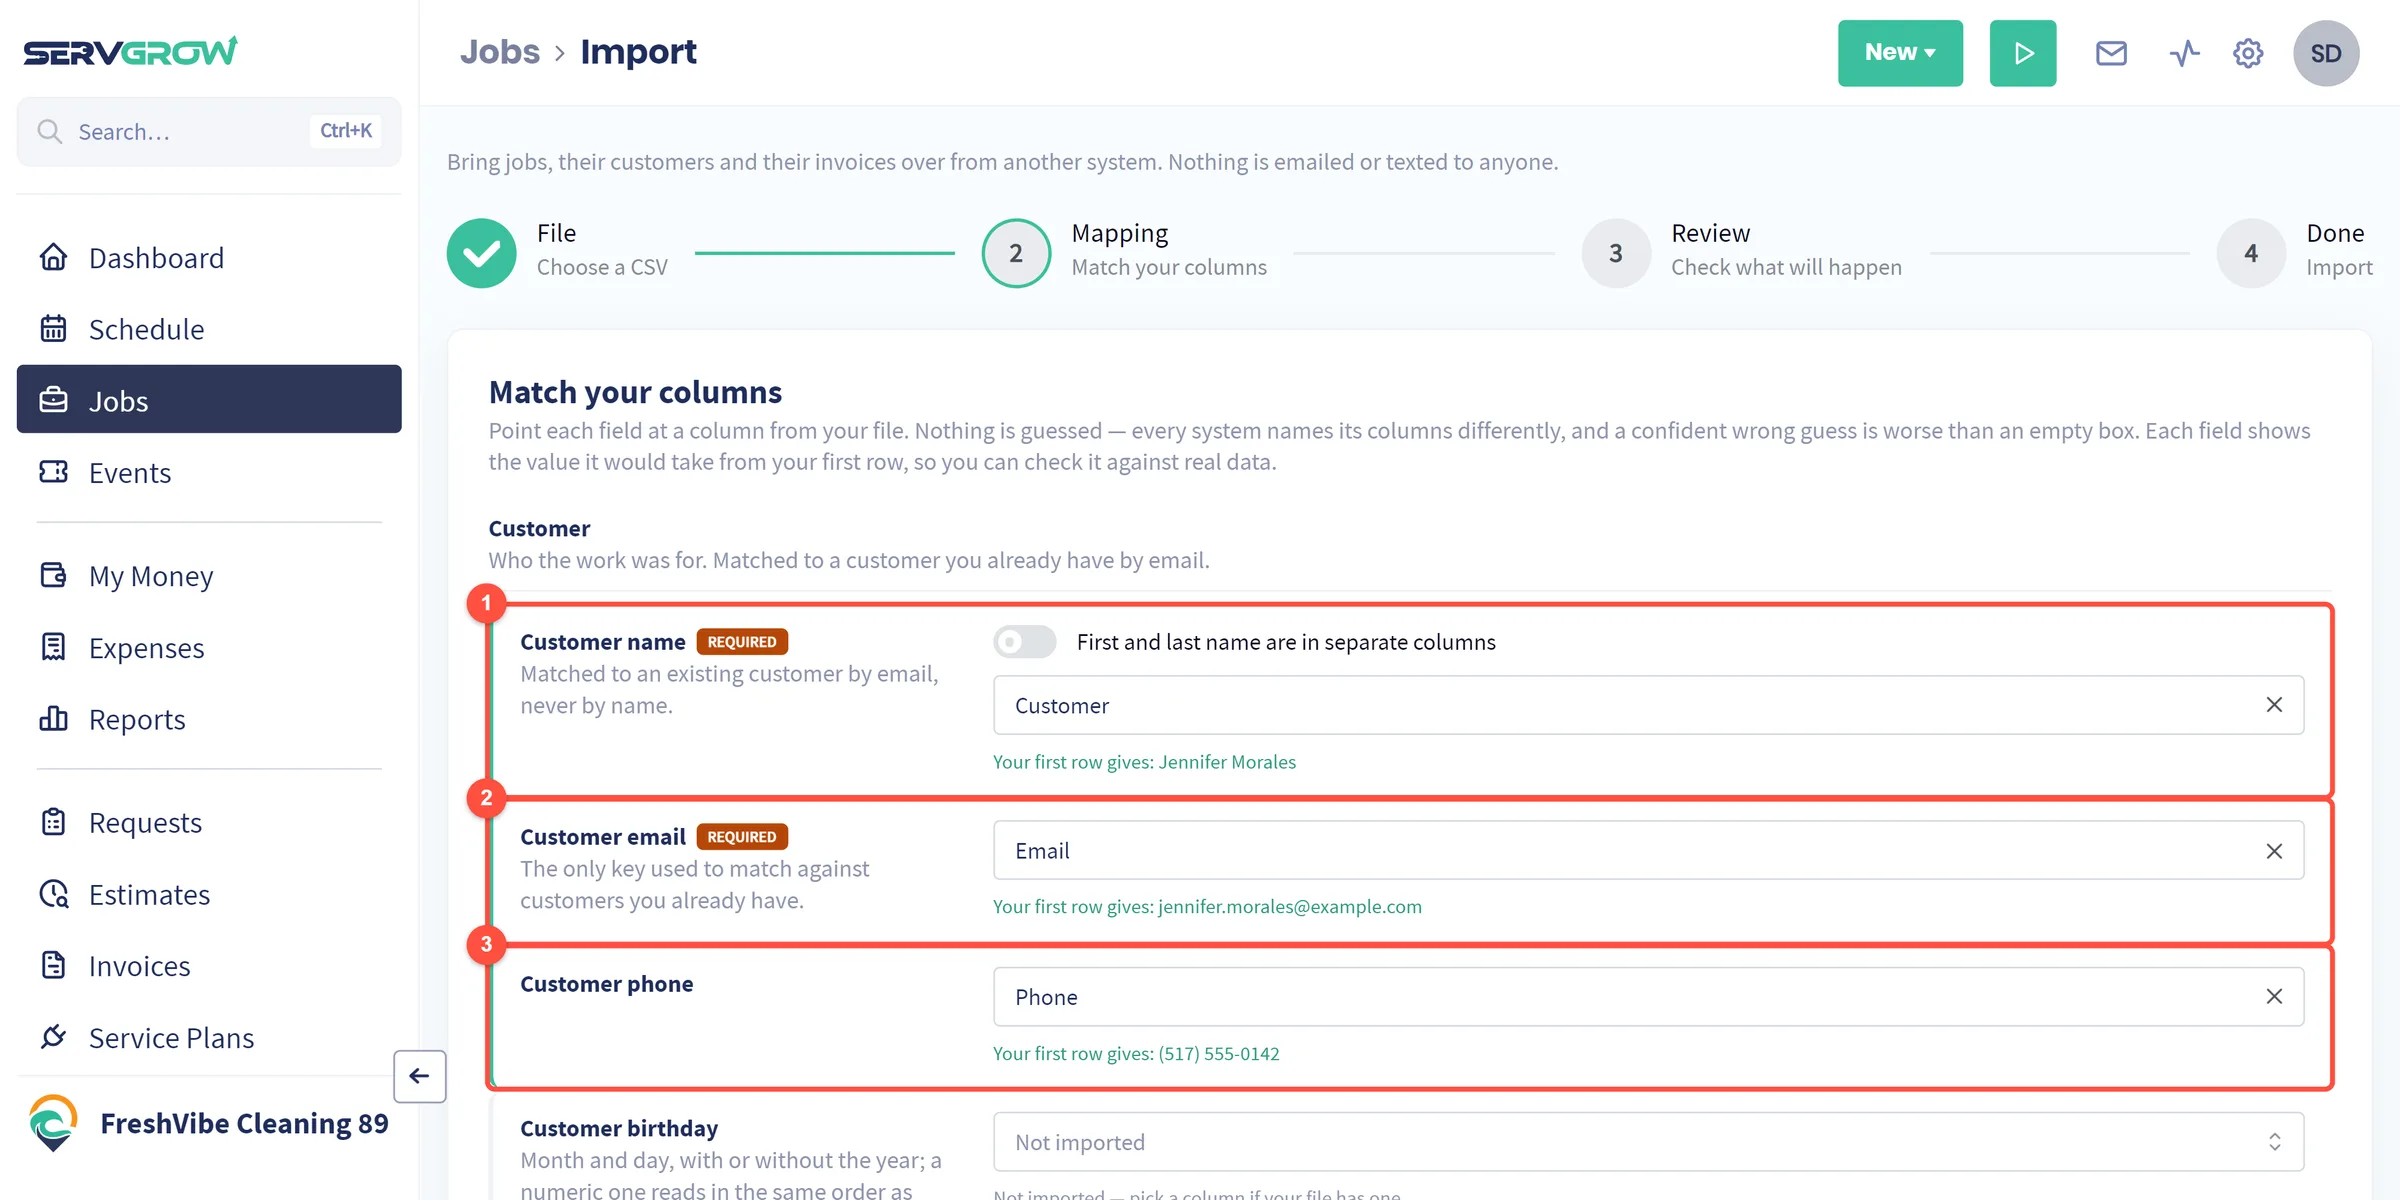
- Customer name: if your file has first and last names in separate columns, turn on First and last name are in separate columns and pick both.
- Customer email: the one thing Servgrow uses to recognise a customer you already have. Names are never used for matching, so two people called John Smith stay two customers.
- Customer phone: optional. Click Show 1 more field for Customer birthday, which is only added to new customers.
Property
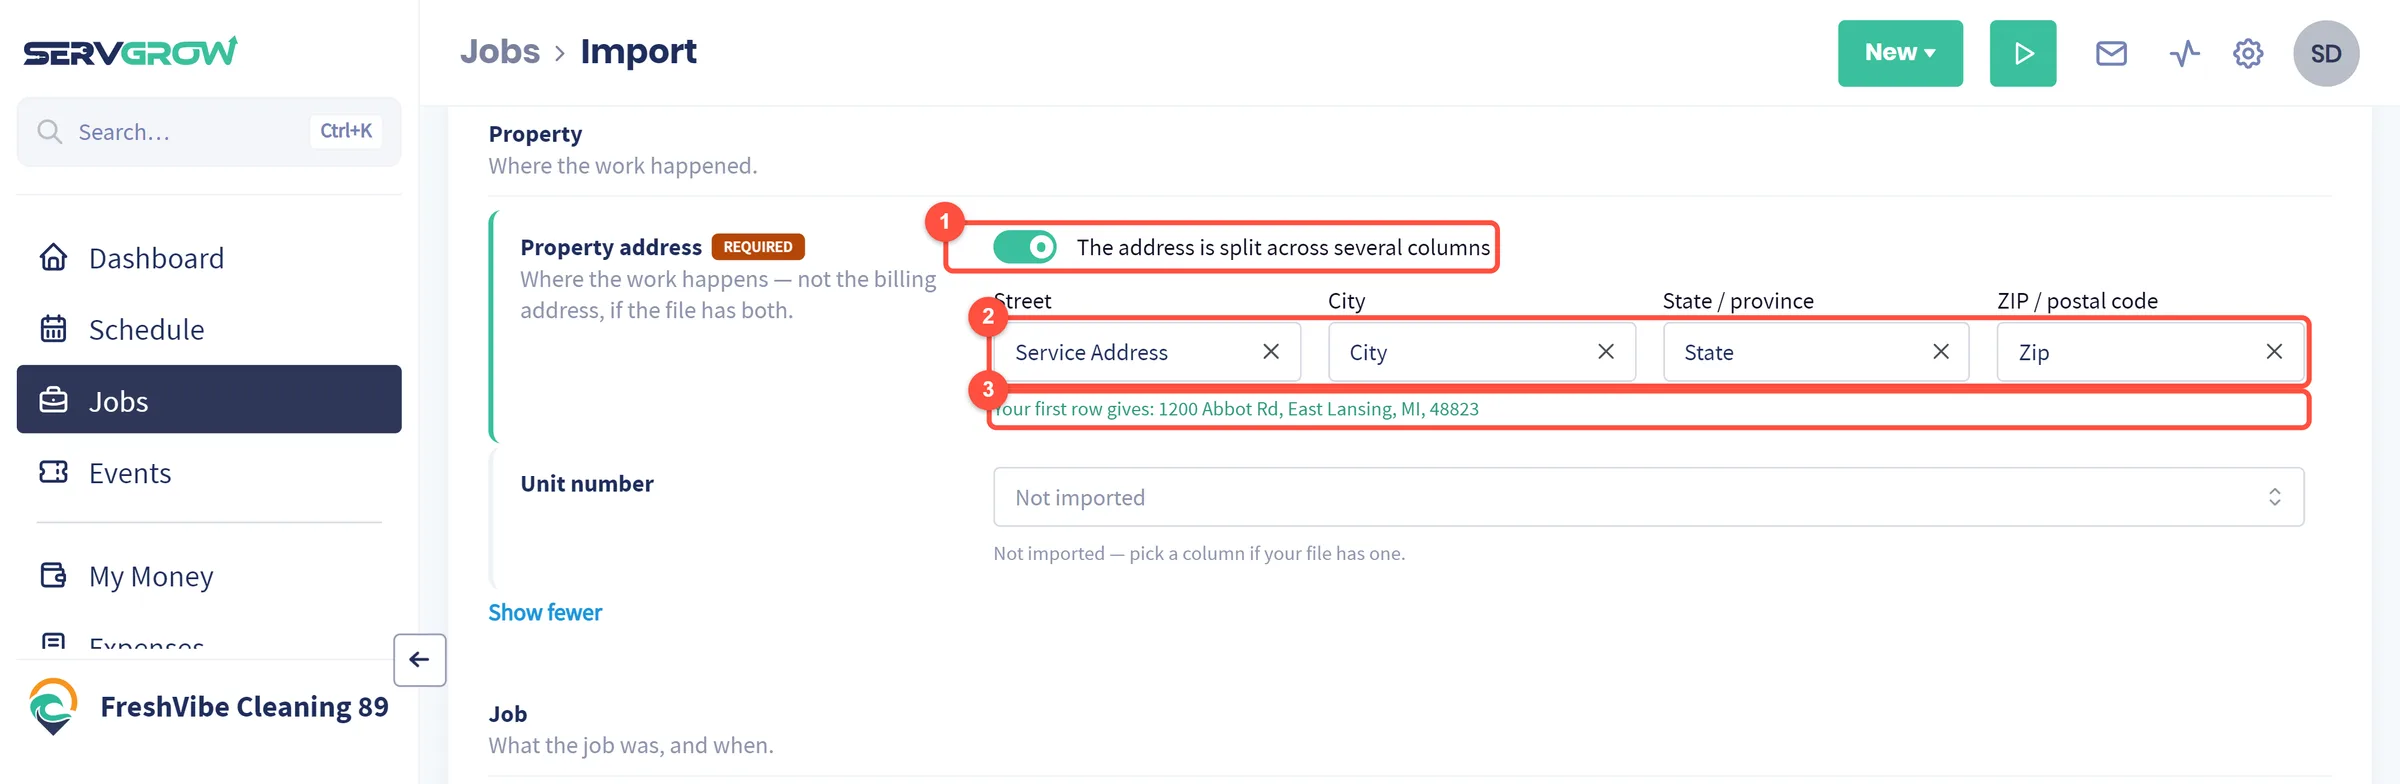
- If the address is spread over several columns, turn on The address is split across several columns.
- Pick the Street, City, State / province and ZIP / postal code columns.
- Check the full address it builds from your first row.
Use the address where the work happens, not the billing address, if your file has both. Unit number is under Show 1 more field.
Job
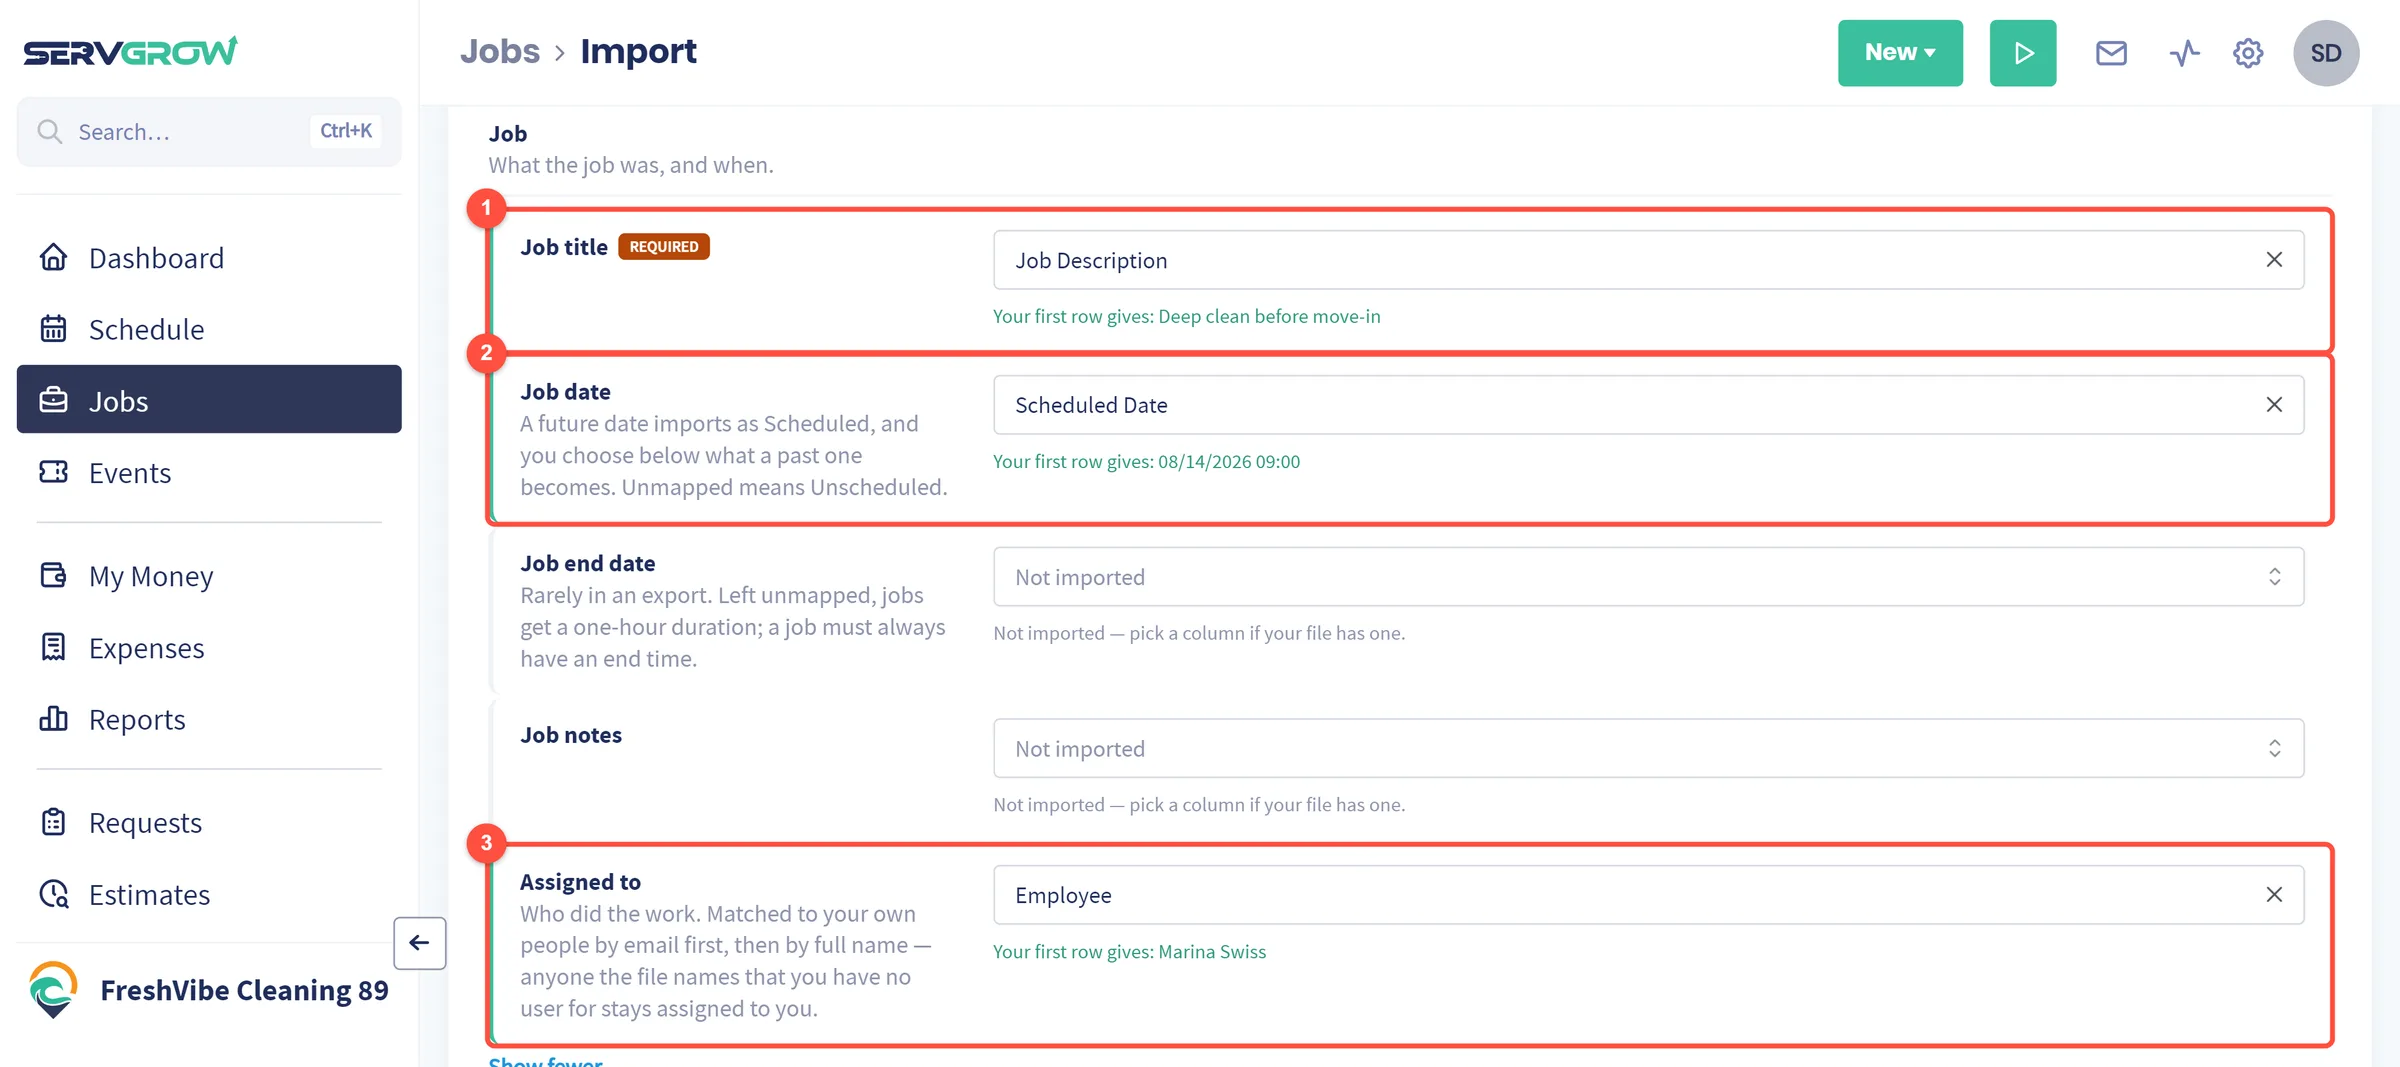
- Job title: what the job was, such as the job description or service name.
- Job date: a future date imports as Scheduled, and you choose below what a past date becomes. Leave it unmatched and every job imports as Unscheduled.
- Assigned to: who did the work. Servgrow matches your own team by email first, then by full name. Anyone it cannot find stays assigned to you.
Under Show 2 more fields you can add a Job end date (without one, each job is one hour long) and Job notes.
Line items and money
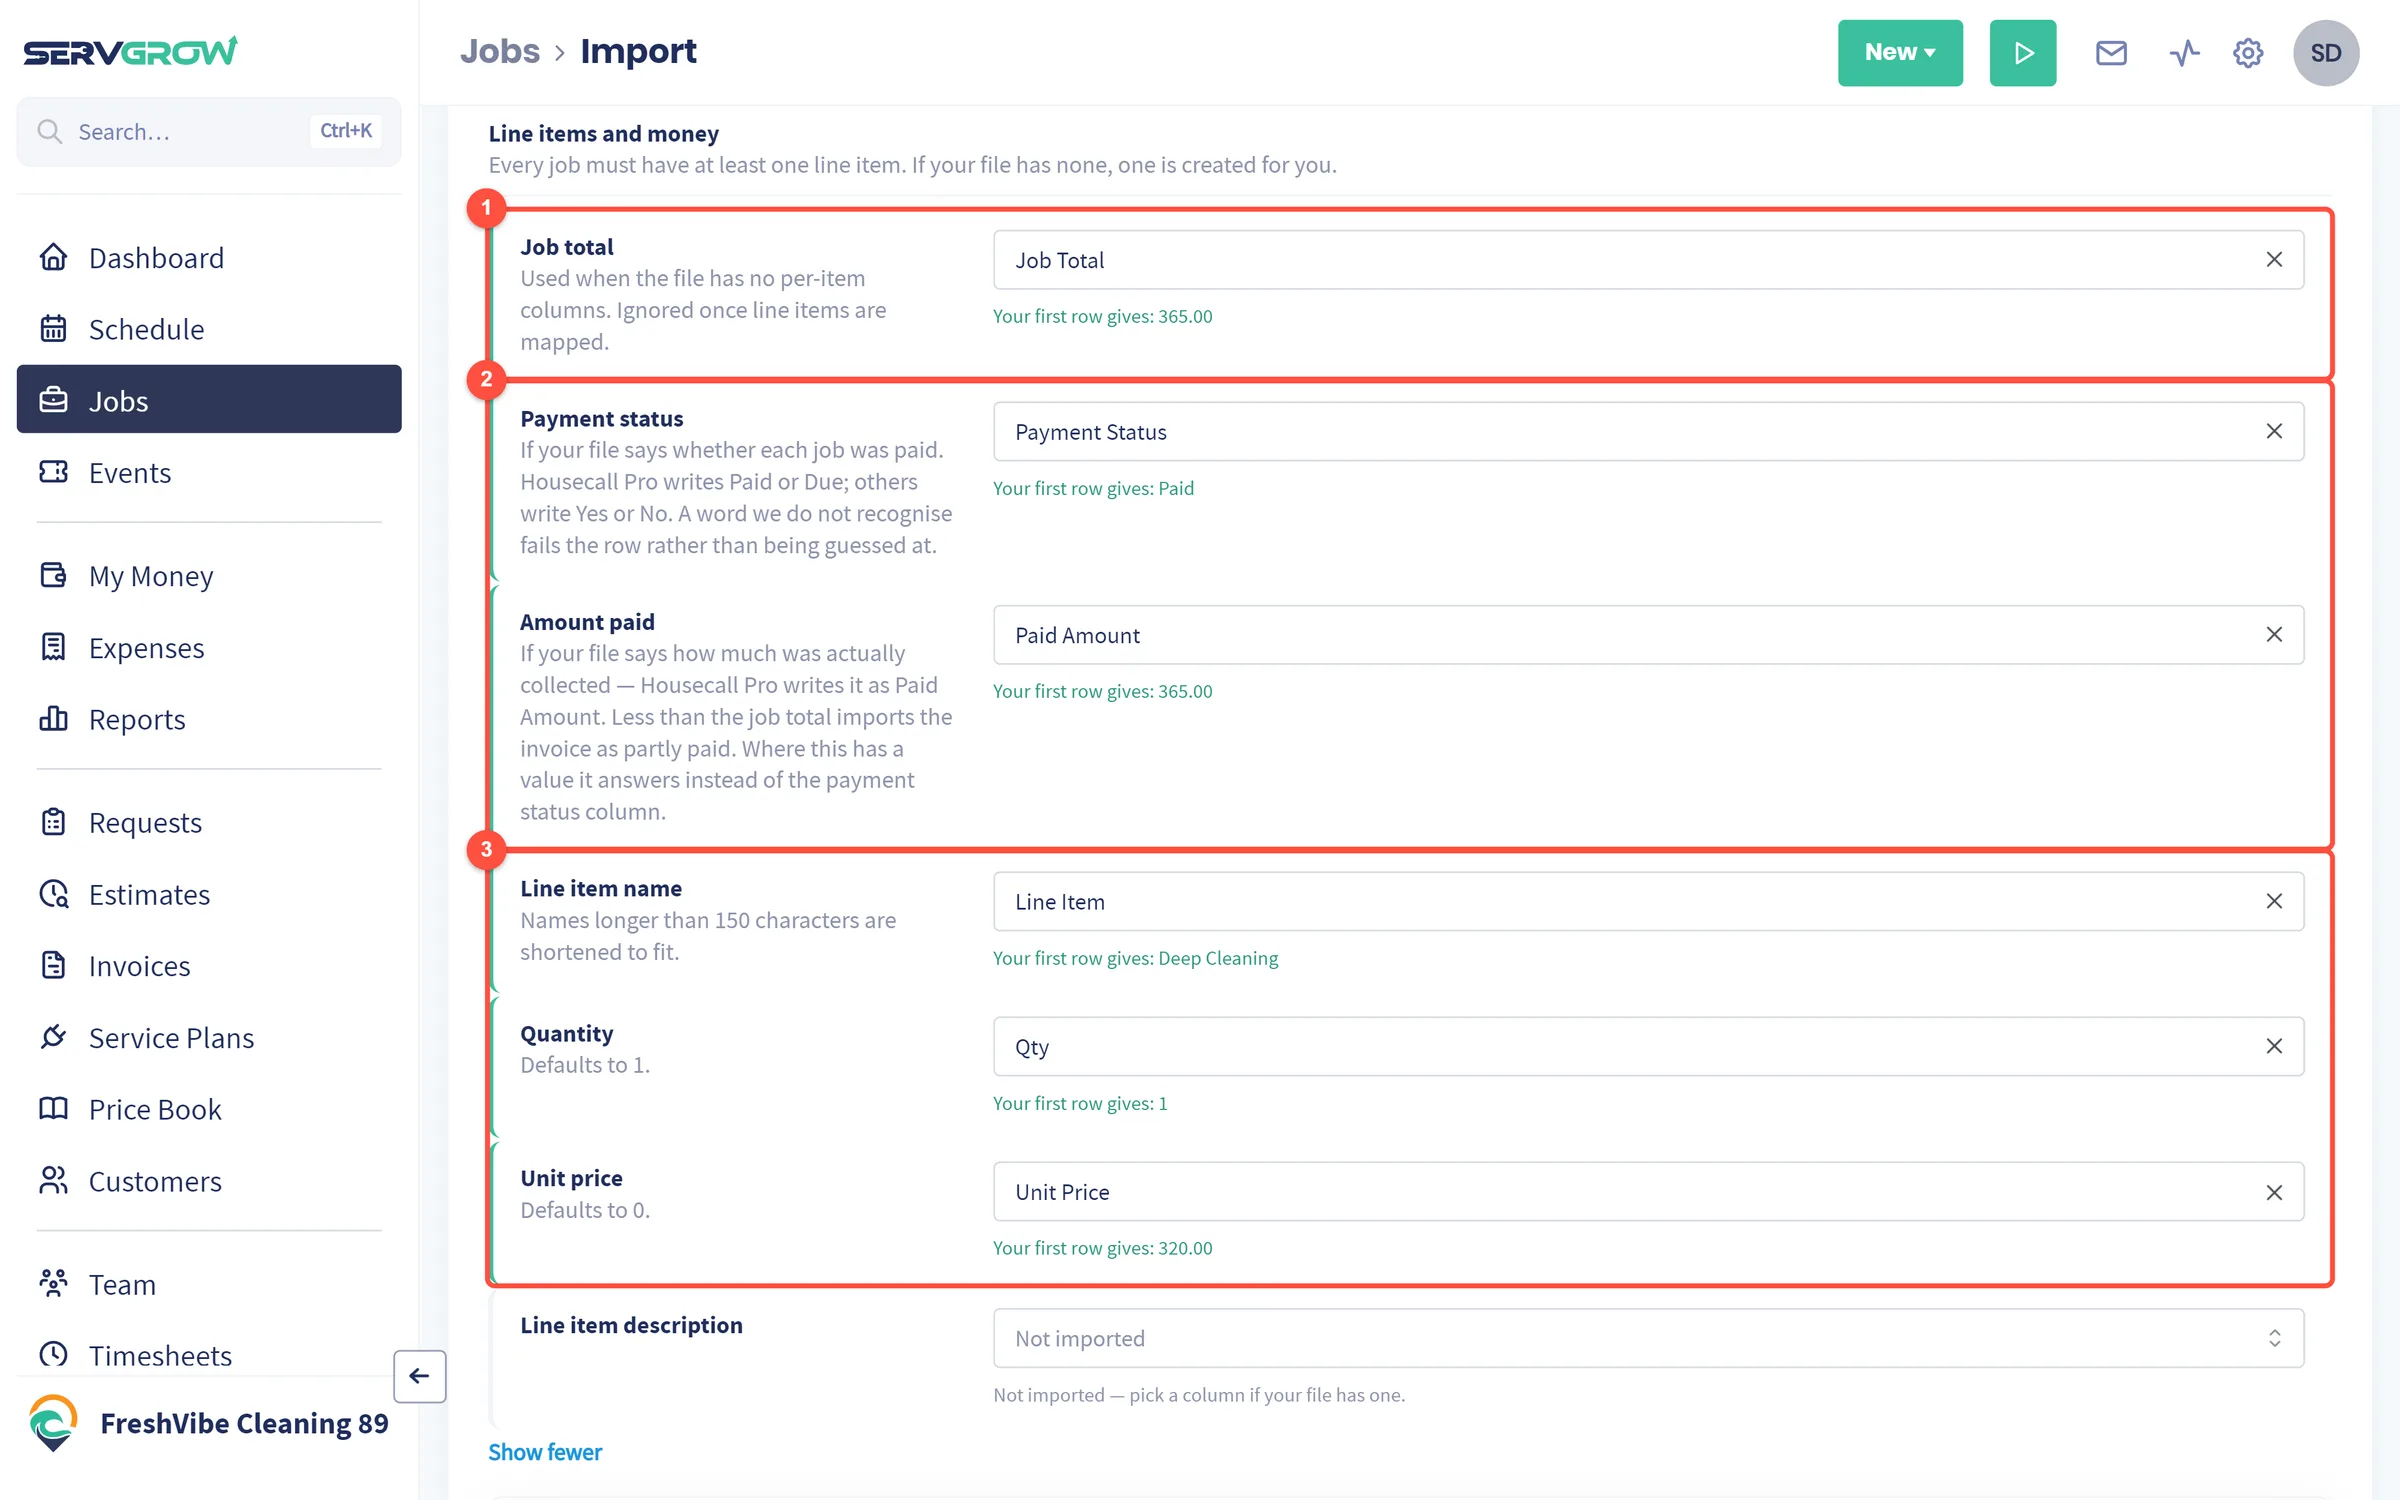
- Job total: used when your file has one total per job and no line items.
- Payment status and Amount paid: tell Servgrow what was already collected. Payment status understands Paid or Due, and Yes or No; any other word stops that row so you can fix it. If Amount paid is less than the total, the invoice imports as partly paid.
- Line item name, Quantity and Unit price: when your file lists what was sold. Quantity defaults to 1. Once line items are matched, the job total is worked out from them.
No line item columns? Each job gets one line item named after its job title and priced at the job total.
Rows, dates, past jobs and payments
Many exports put each line item on its own row and repeat the job or invoice number. Grouping folds those rows back into one job.
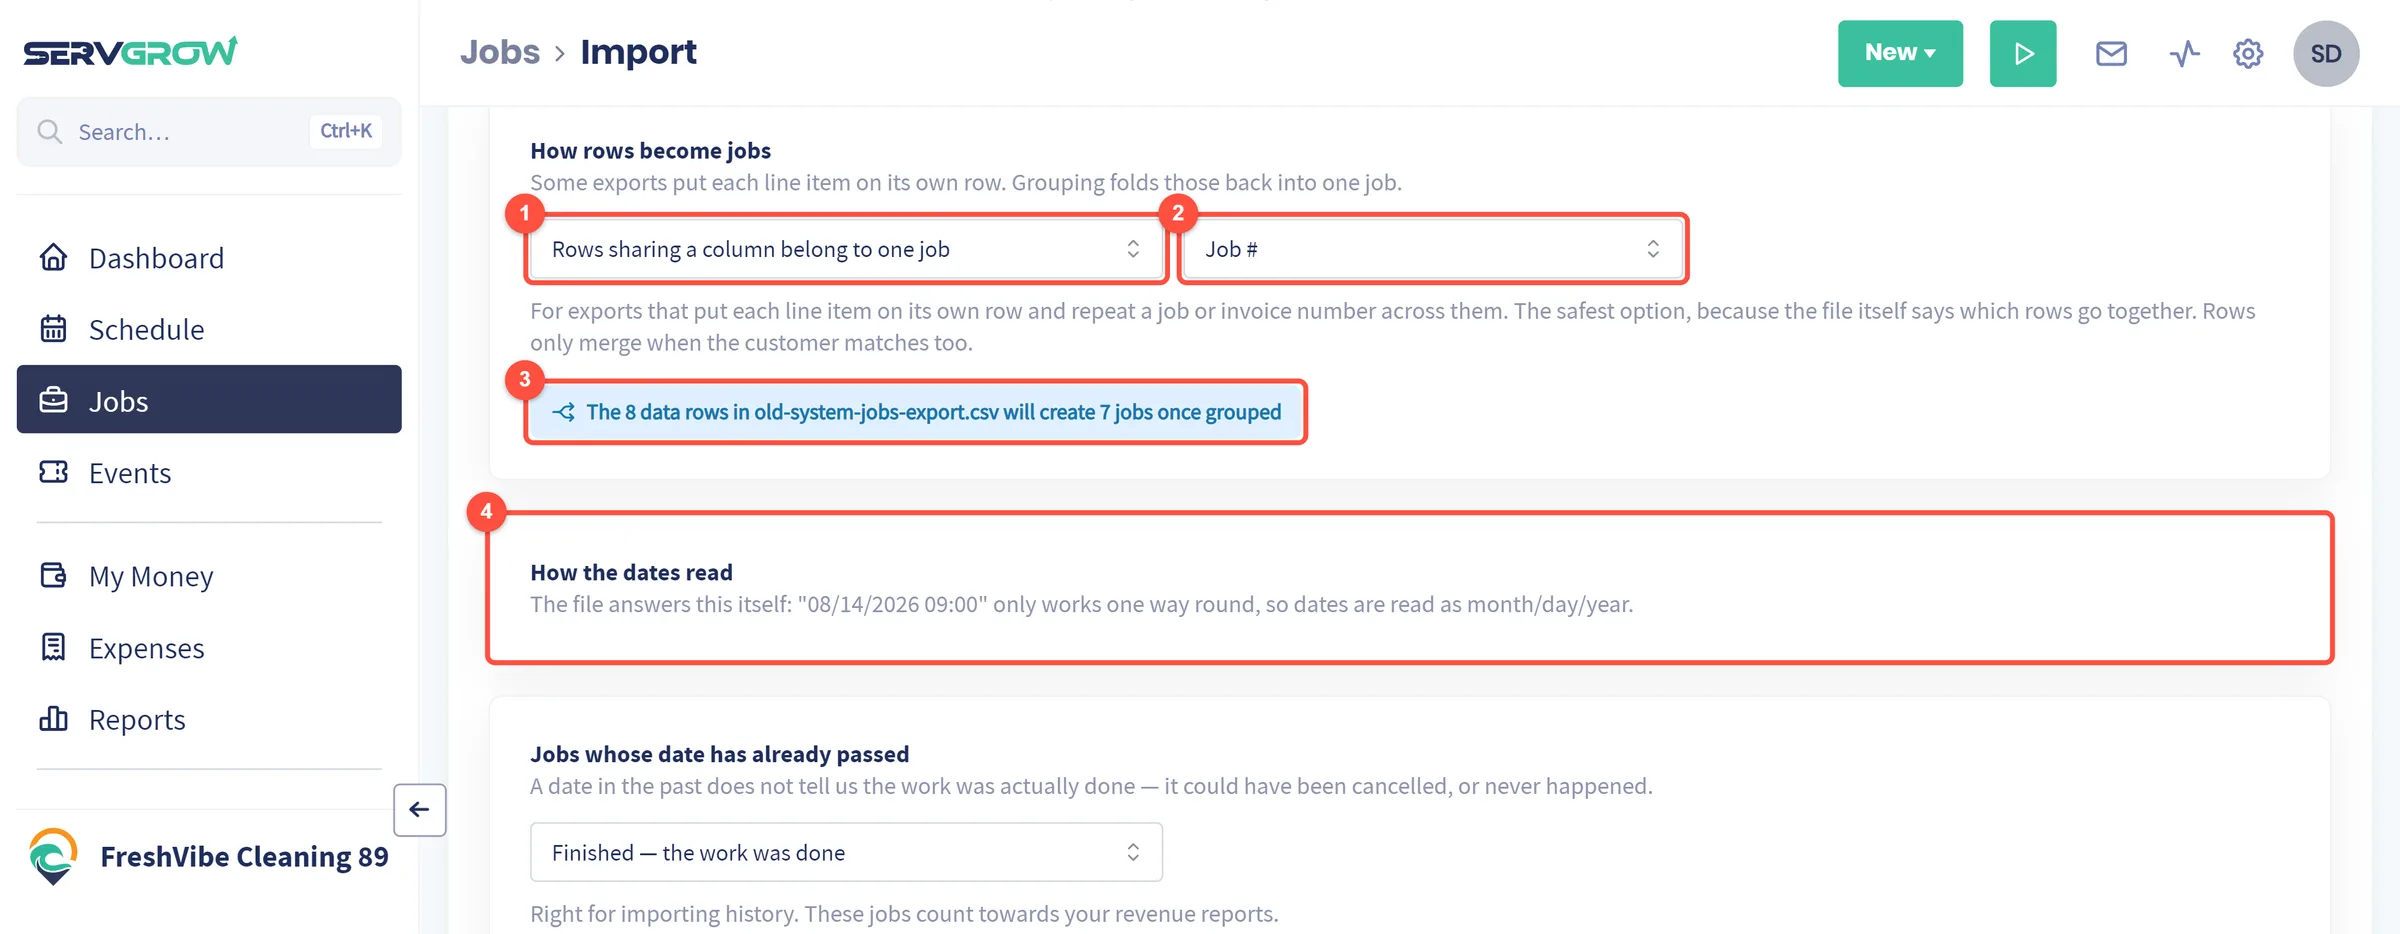
- How rows become jobs:
- Every row is its own job: the default, for files where one row is one whole job.
- Rows sharing a column belong to one job: the safest choice when your file has a job or invoice number. Rows only merge when the customer matches too.
- Rows with the same customer and date are one job: for files with no job number. Two separate visits to one customer on the same day would become one job, so check them on the next step.
- Pick the column that identifies a job, such as the job or invoice number.
- Servgrow tells you how many jobs your rows will make.
- How the dates read: Servgrow works out from your file whether dates are month first or day first. If it cannot tell (03/04/2026 could be 4 March or 3 April), it asks you to choose.
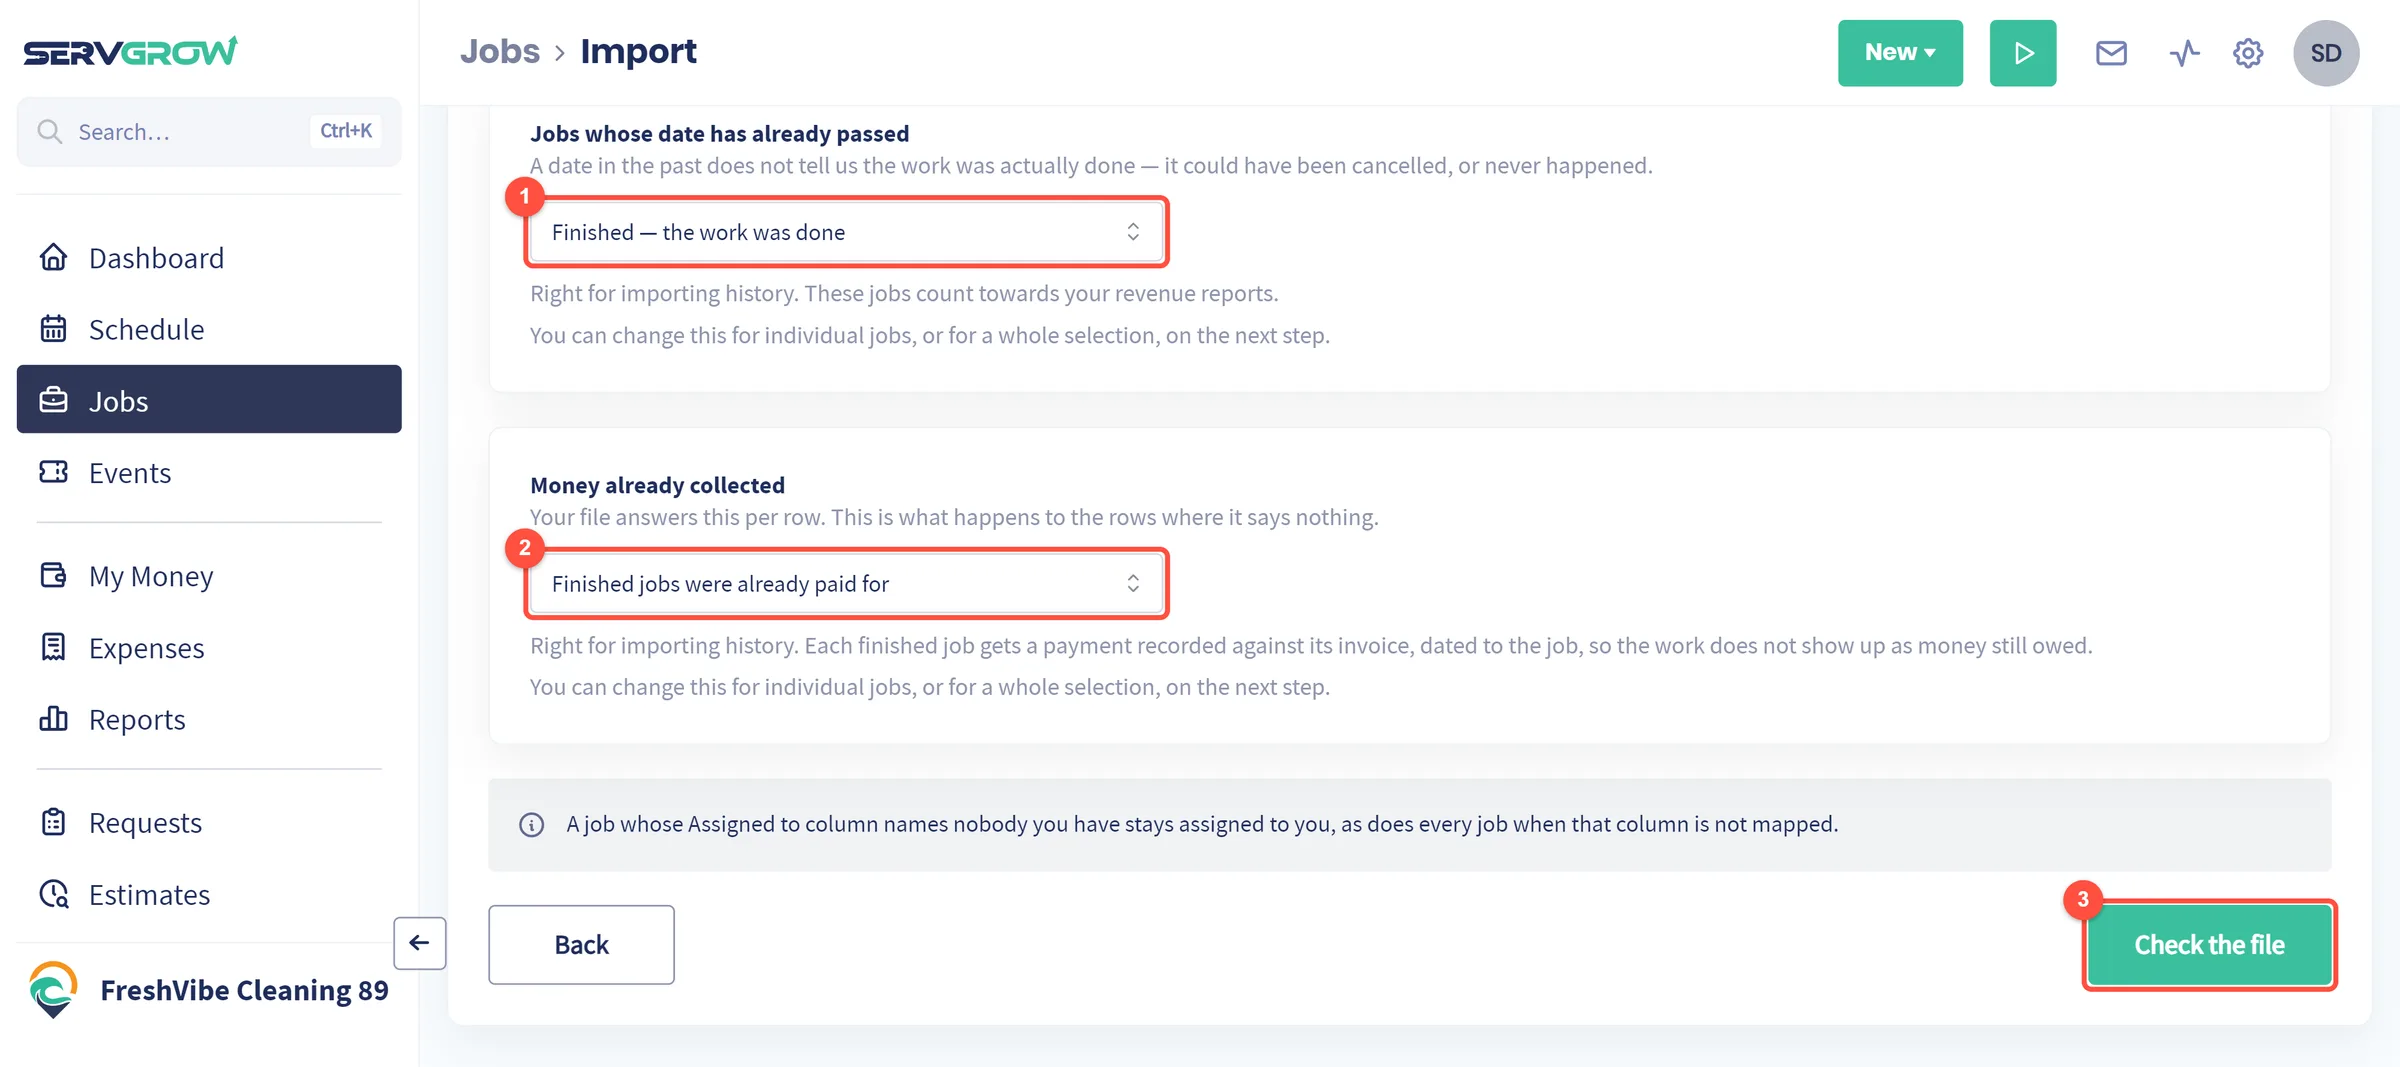
- Jobs whose date has already passed: pick Finished to bring in your history as done work that counts in your revenue reports, or Scheduled if the file also holds jobs that were cancelled or never happened.
- Money already collected: Finished jobs were already paid for records a payment on each finished job's invoice, dated to the job, so old work does not show up as money still owed. Pick Leave everything unpaid only if you still mean to collect it. When your file says per row whether a job was paid, it answers for those rows and this choice covers the rest.
- Click Check the file.
If you charge sales tax, a Sales tax box also appears. Pick the rate to apply to every job in the file, and say whether the amounts in your file already include it (right for most exports) or are before tax.
Step 3: Review before importing
Servgrow checks every row and shows you exactly what will be created. Nothing has been written yet.
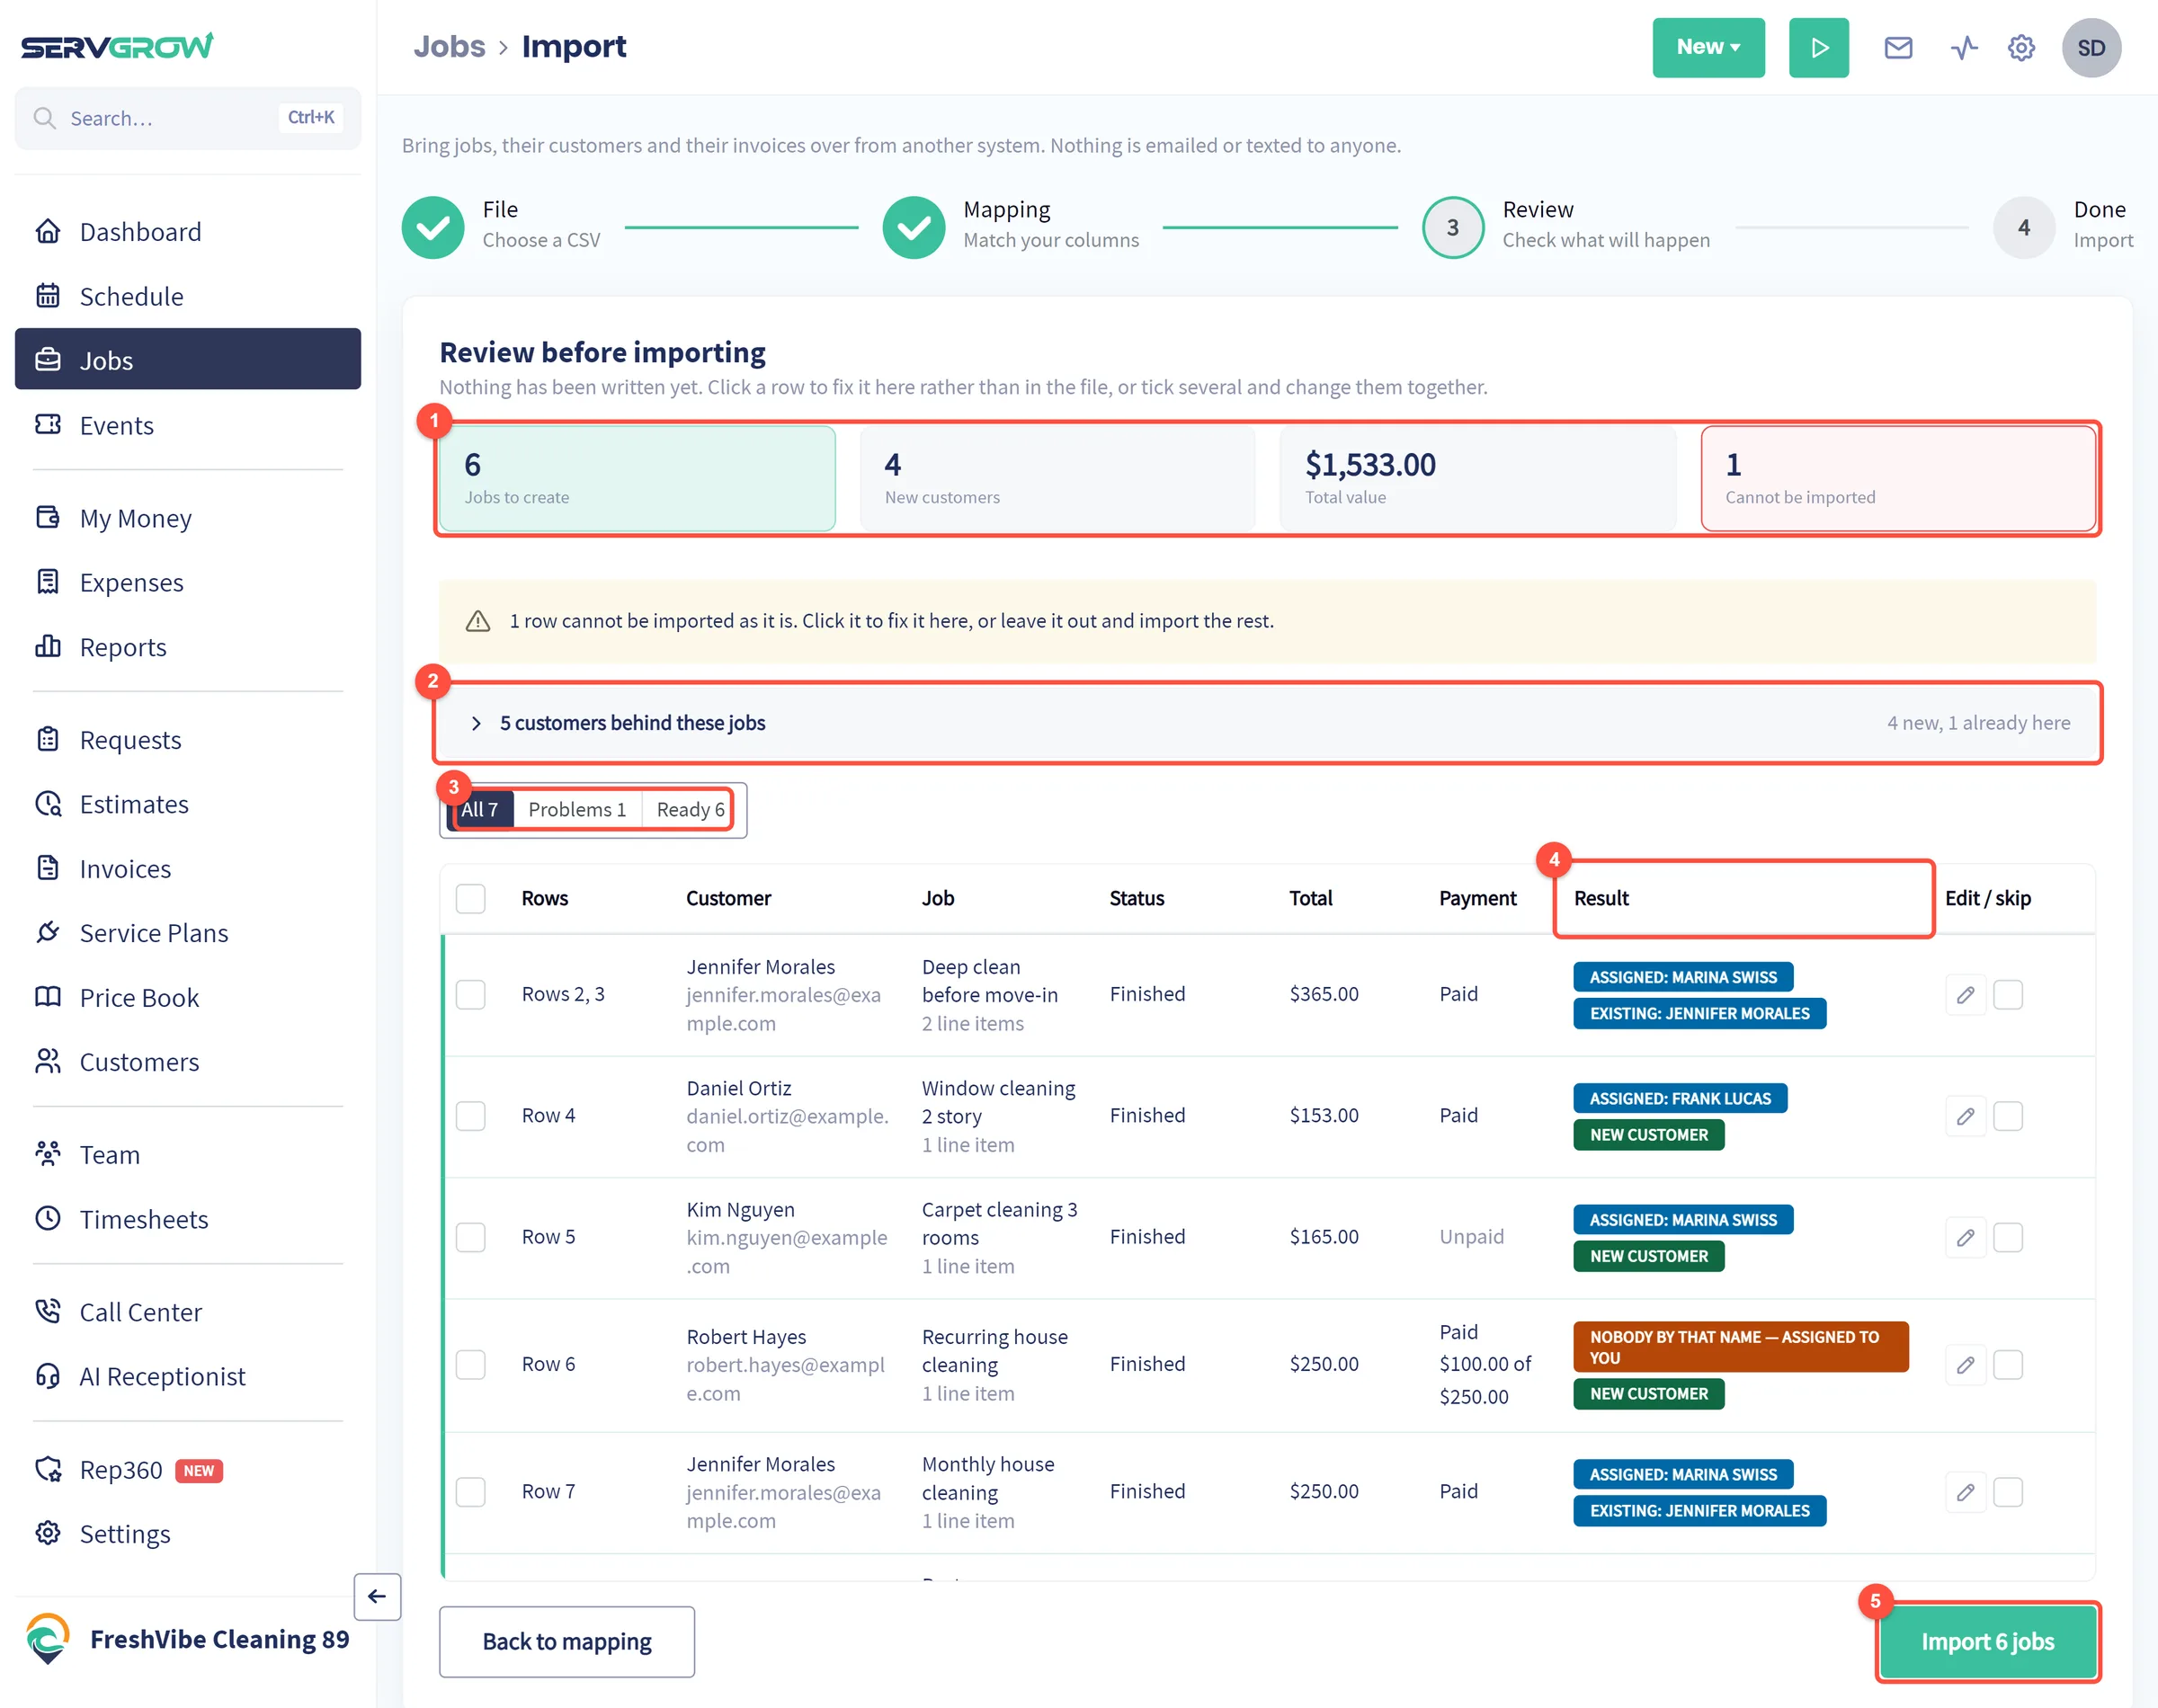
- The totals: Jobs to create, New customers, Total value and rows that Cannot be imported.
- Customers behind these jobs: open it to see which customers you already have and which will be created.
- Show All rows, only the Problems, or only the rows that are Ready.
- Result: who each job is assigned to, whether its customer is new or existing, and anything that stops the row from importing.
- When it all looks right, click Import. The button shows how many jobs will be created.
A row that matches a job already in your account (same customer, same title, same date) is marked Already imported and left out, so importing the same file twice does not double your invoices.
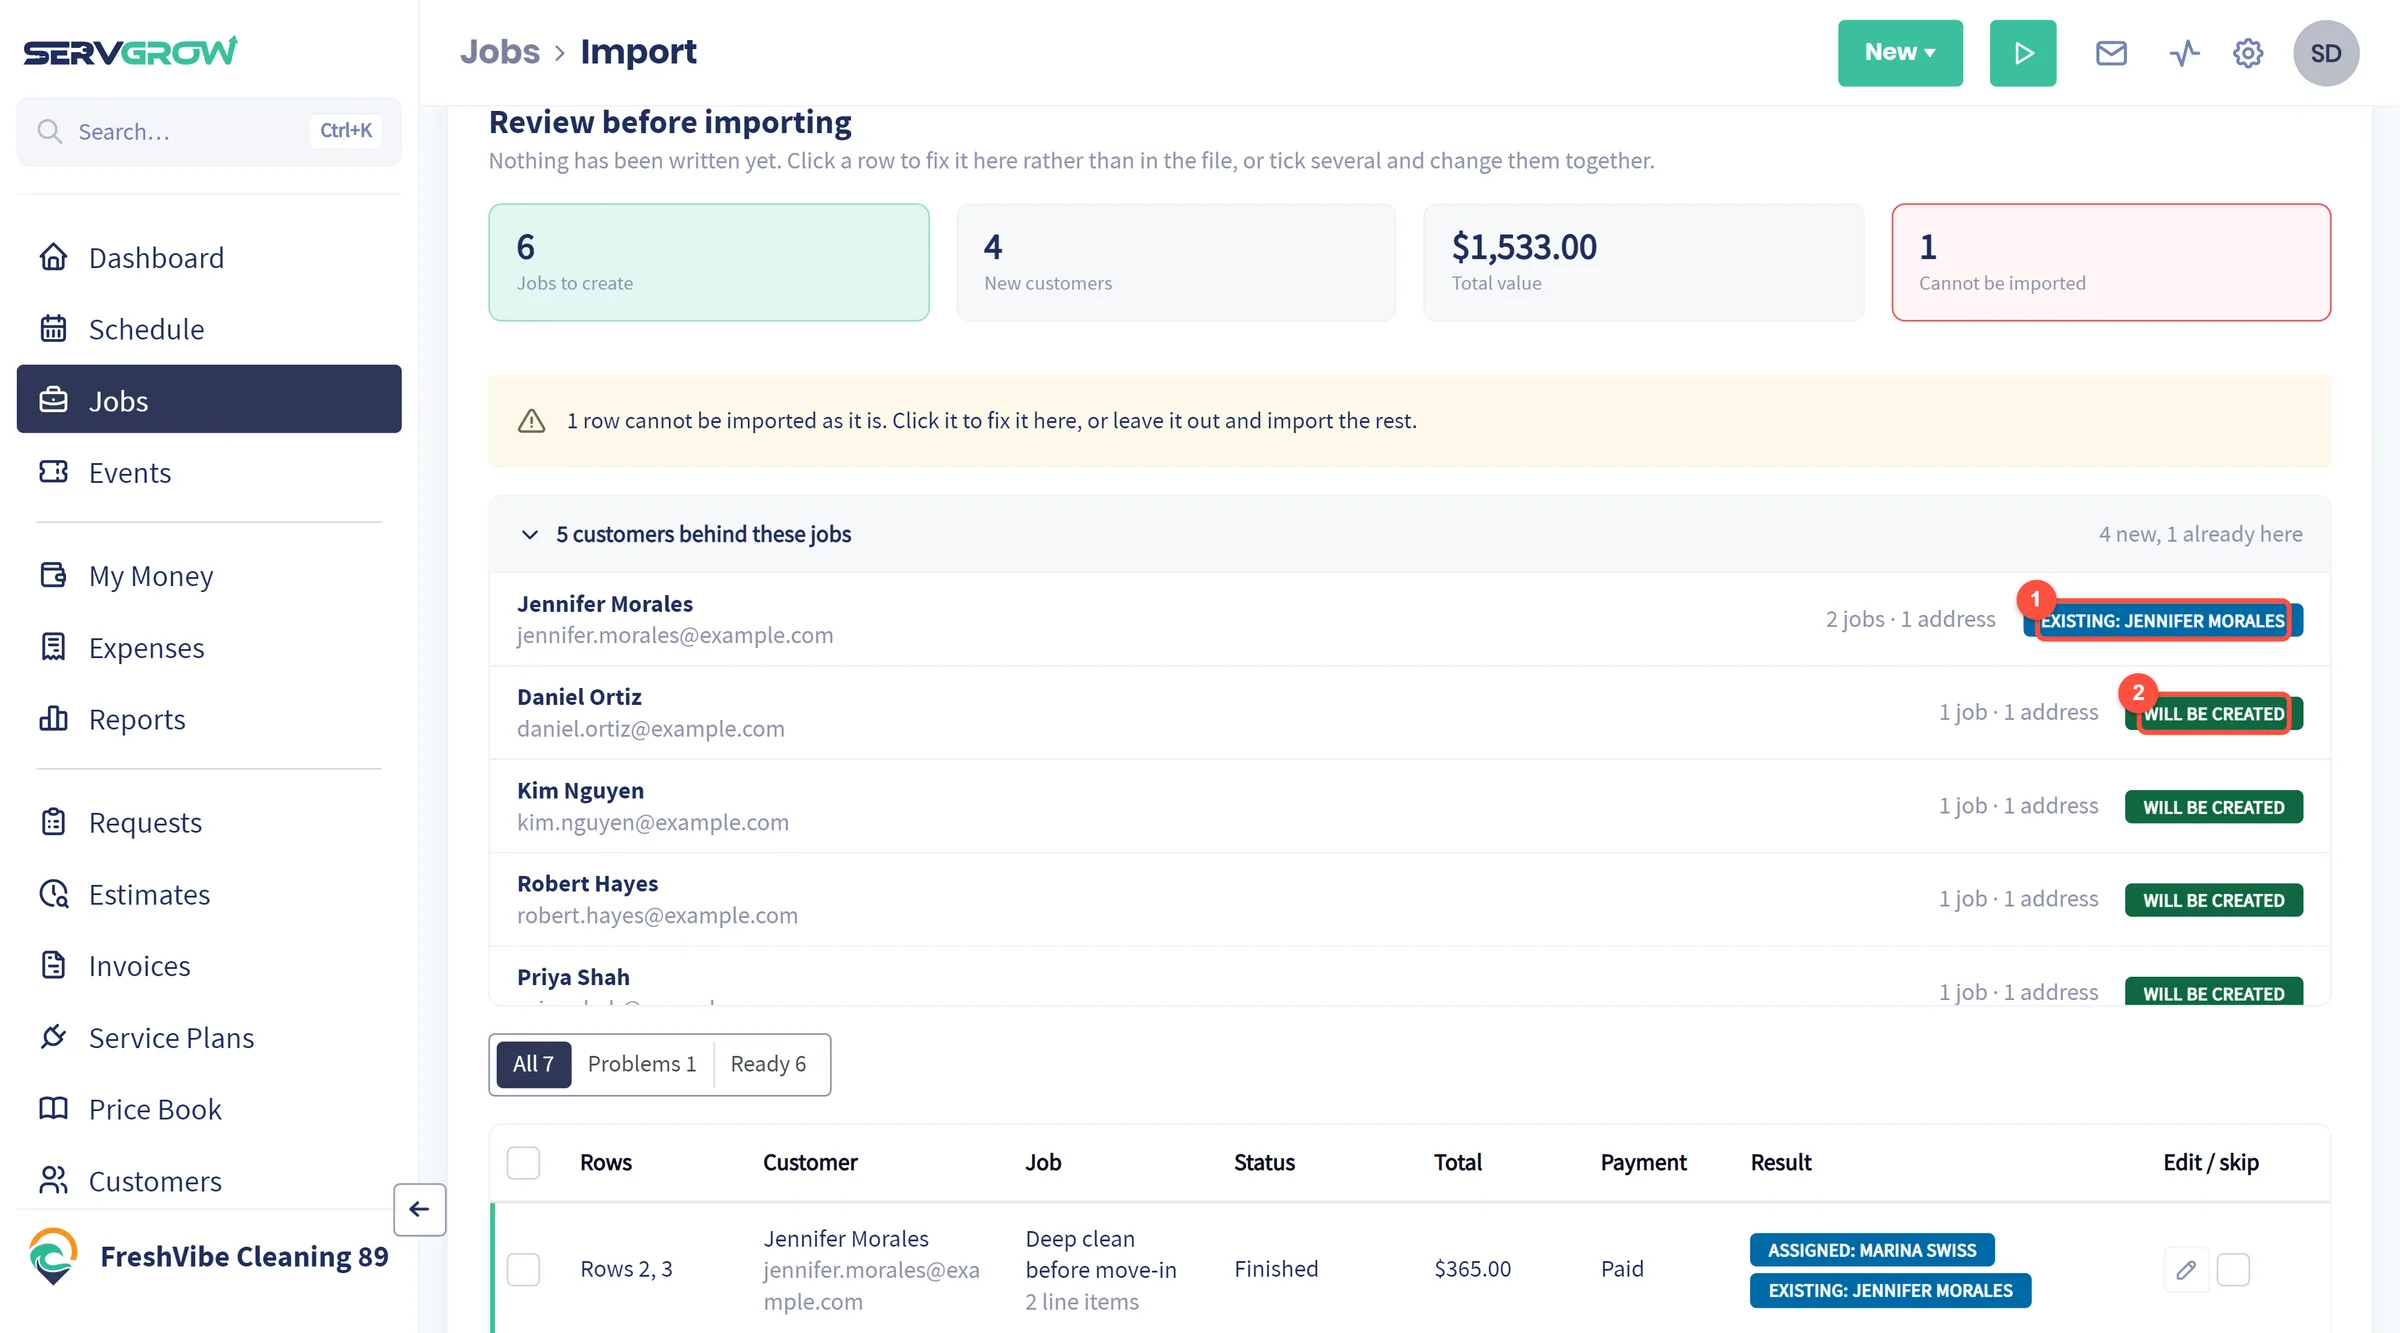
- Existing: the email matched a customer you already have, so the jobs are added to that customer instead of creating a second one.
- Will be created: a new customer, with every job and address from the file. Rows with the same email become one customer.
Fix a row without touching the file
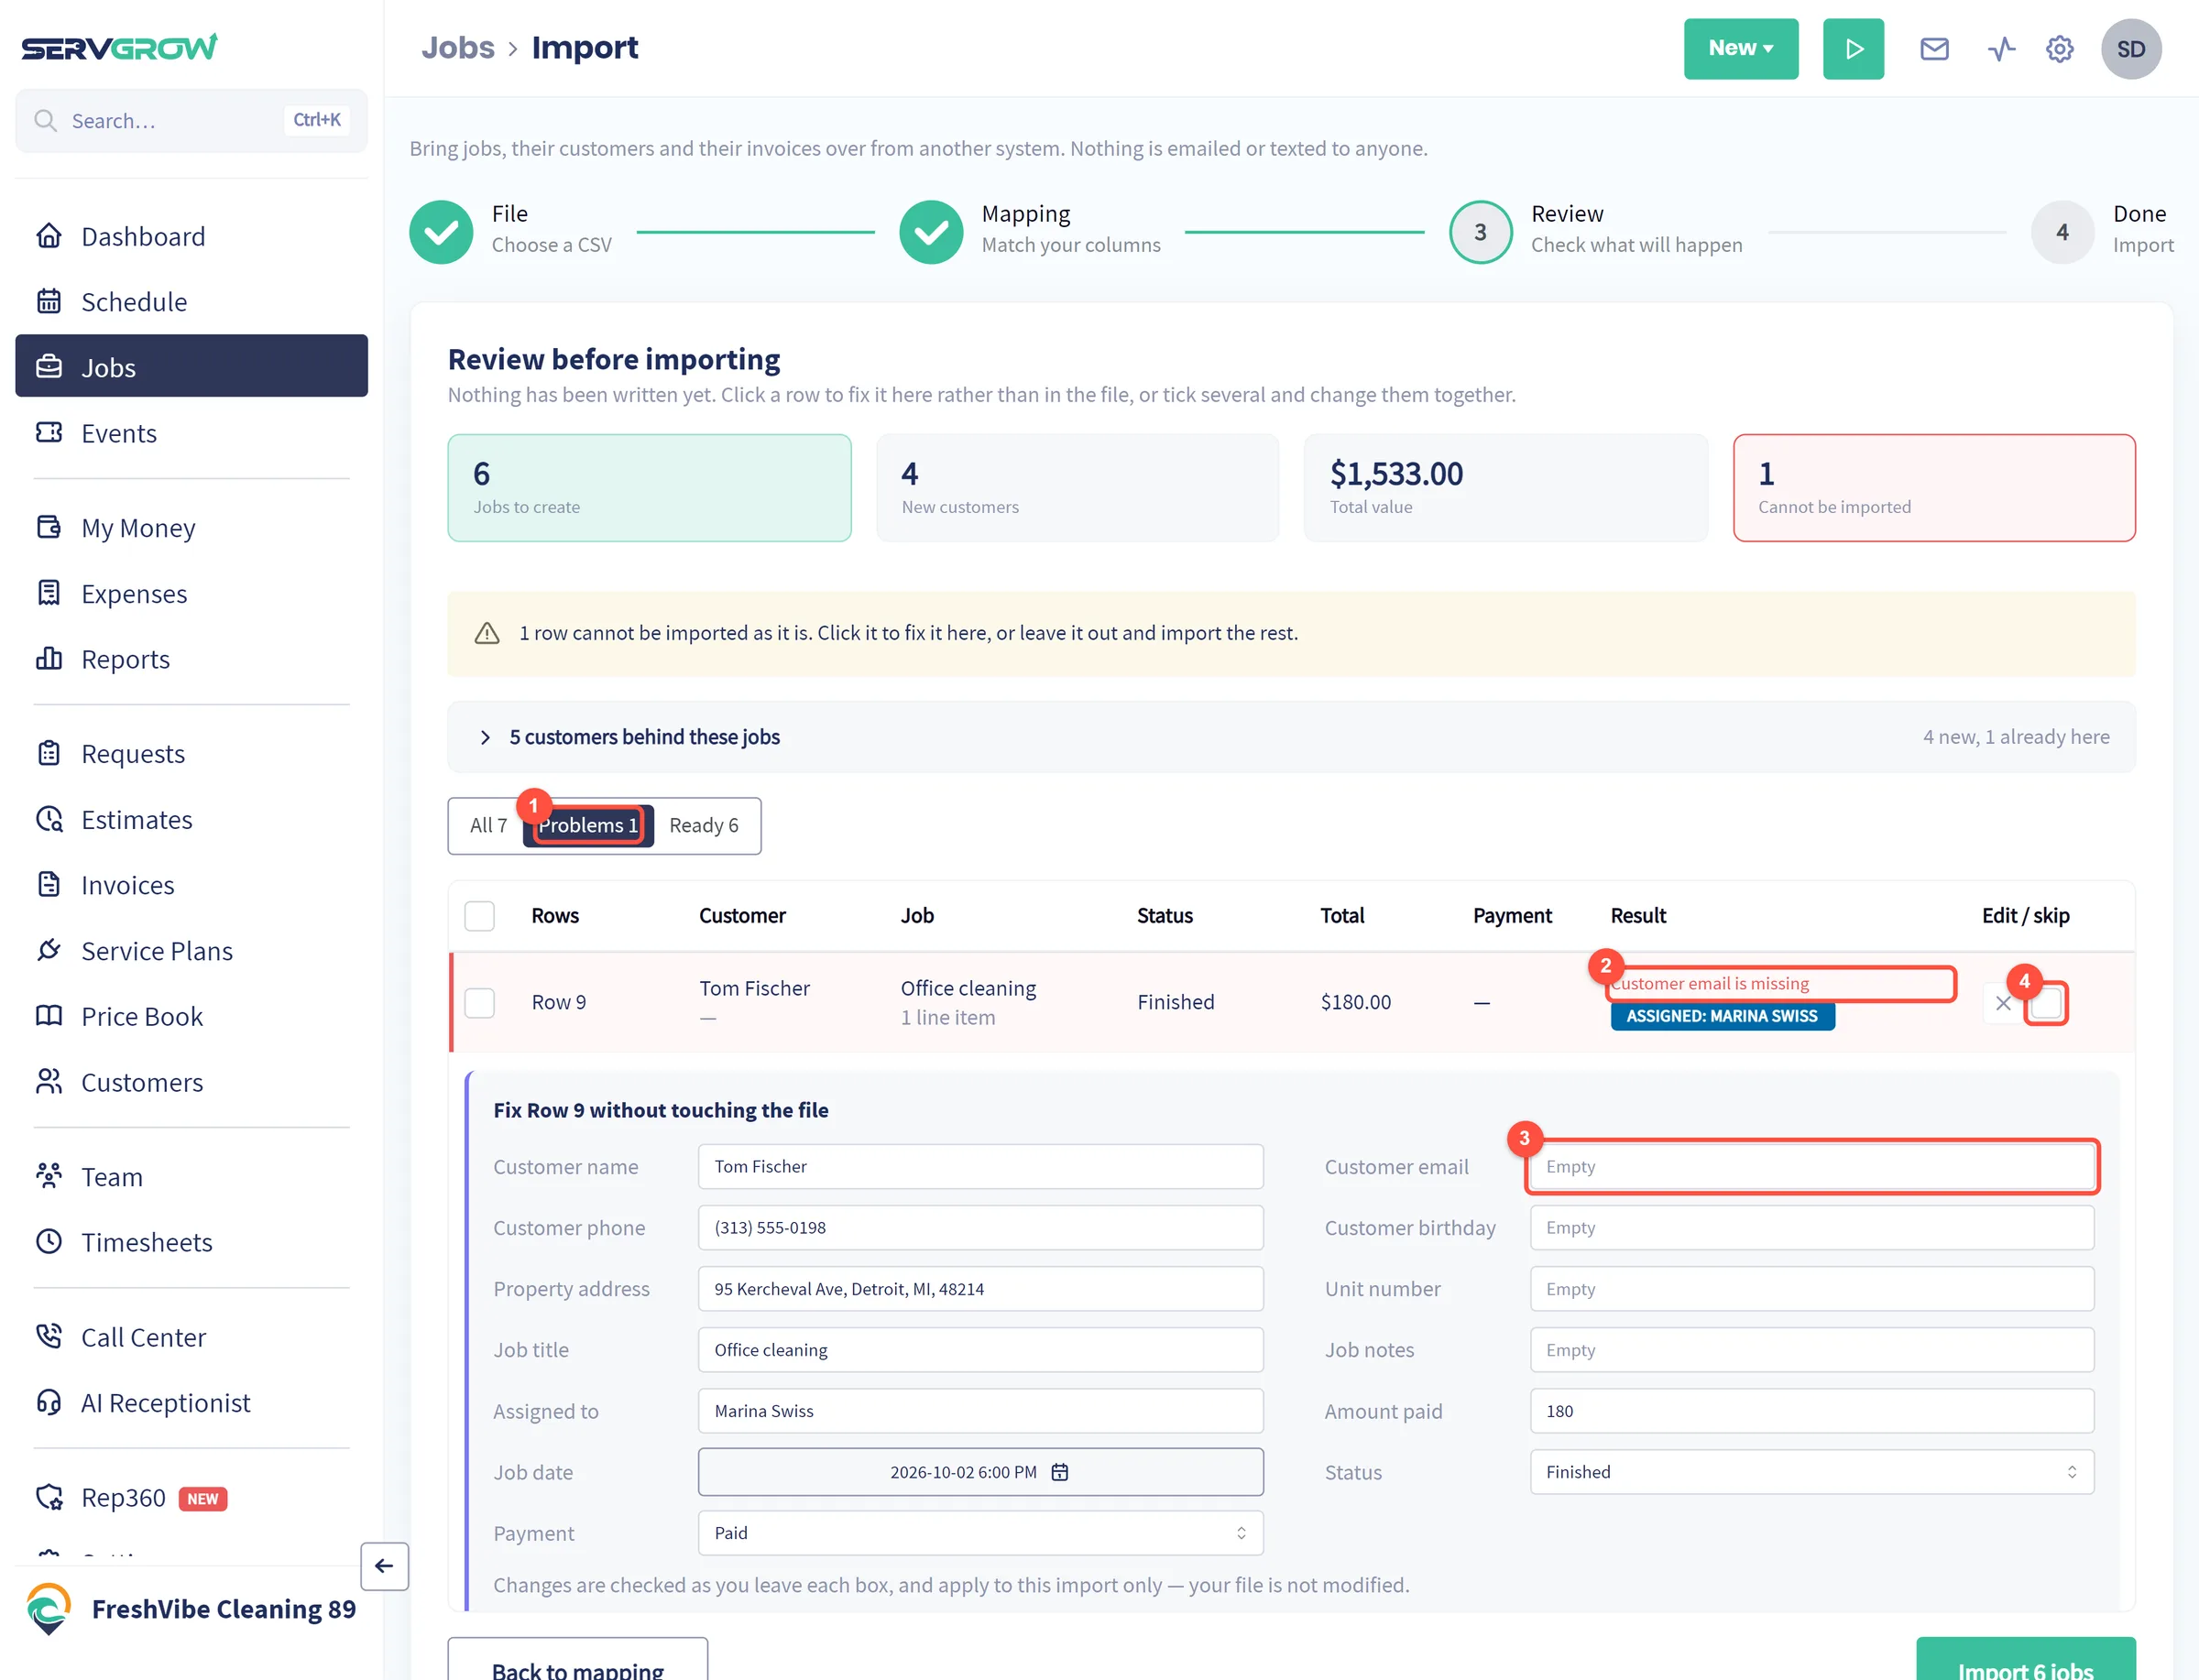
- Click Problems to see only the rows that cannot be imported yet.
- The reason is shown on the row, here a missing customer email.
- Click the row, or its pencil, and type the fix, such as the customer's email. Each change is checked as you leave the box and applies to this import only; your file is not changed.
- Or tick the row's Skip box to leave it out and import the rest.
Change several rows at once
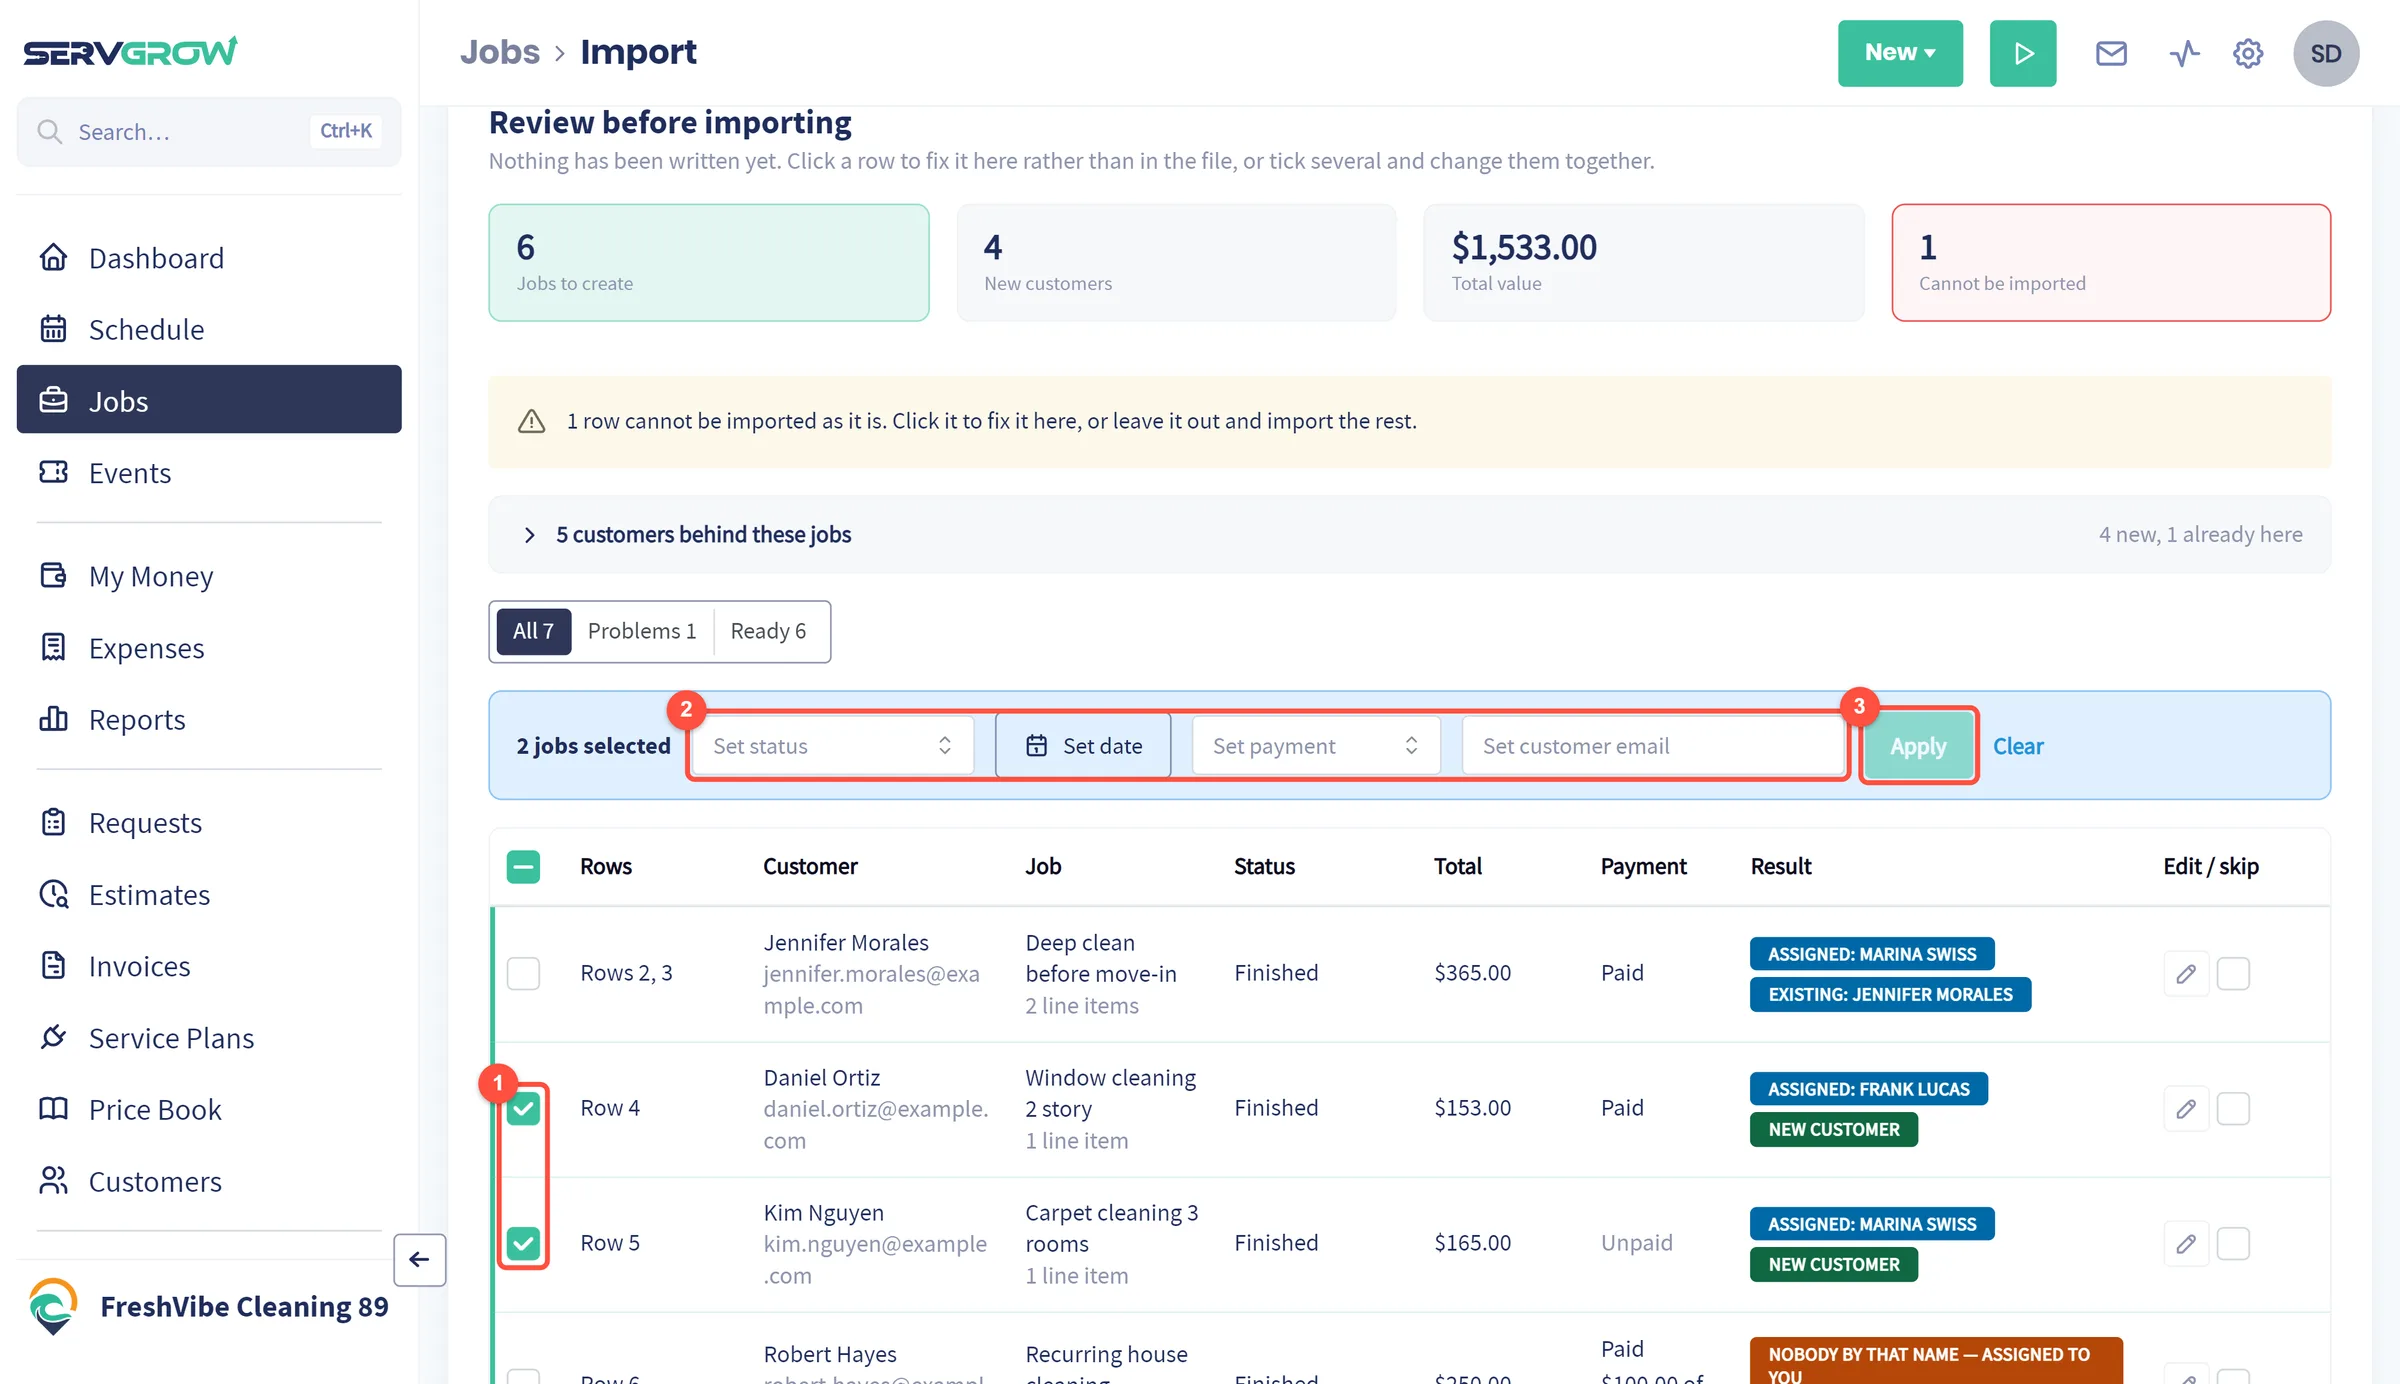
- Tick the rows you want to change.
- Choose a new status, date, payment or customer email for all of them.
- Click Apply.
Step 4: Done
The import creates each job with its invoice and shows how many jobs and customers were created, how much was invoiced and how much was recorded as collected. Nothing is emailed or texted to anyone. A large file takes about a minute for every thousand rows, so keep the page open until it finishes.
If the import stops part way, go back to the review step: the rows that went in are recognised and left out, so you can finish the rest without creating anything twice. Click Go to jobs to see your imported work.
Tips
- Try a small file first. Import ten rows, check a couple of jobs and customers in Servgrow, then import the rest.
- Make sure every row has an email. Email is how Servgrow tells customers apart. Rows without one cannot be imported until you add it on the review step.
- Note the totals on the Done screen. Imported jobs do not record which file they came from, so write the numbers down if you import several files.
- Add your team first. Jobs are matched to the people already in Servgrow; anyone missing is assigned to you.
- Watch your campaigns. A Custom Campaign that starts when a customer is added only counts these customers if you ticked Job import on it. Leave that off unless you want every imported customer to get the message.
- Only need a customer list? Use Customers > Import/Export with the customer template instead.
Related articles
Was this article helpful?